
How to Link Discord and Slack Channels
by Ashley Bilbrey on 08 July 2025My local hacker space has both a Slack workspace and a Discord server. Recently the group has been trying to decide if we should stick to one platform. Keeping multiple platforms requires keeping an eye on multiple apps, duplicating announcements, and more. At the core, Slack and Discord are essentially ✨ fancy ✨ versions of old school IRC channels. Why not let people choose one platform that they prefer, while relaying messages between the two?
This guide will go step-by-step on how to use matterbridge, a software designed to connect chat services together, to link Slack and Discord channels.
Note: This guide temporarily has an extra step due to Slack discontinuing “legacy” apps. This guide will be updated when matterbridge is fully updated to support “modern” Slack apps.
What You’ll Need
- A Discord server.
- A Slack workspace.
- A server or computer that you can keep running and connected to the internet, preferably running on renewable electricity.
- Docker Engine installed on the server or Docker Desktop on the computer.
- Git installed on that server or computer.
Slack Setup
First to create a Slack app and make sure it has the proper permissions.
Make sure you are logged into your Slack Workspace, then head to the Slack API Apps page.
Click the “Create an App” button, select “From manifest”. Select the Slack workspace that you want to bridge. Then, copy and paste this configuration. This configuration file loads all the permissions that the bot needs in your workspace.
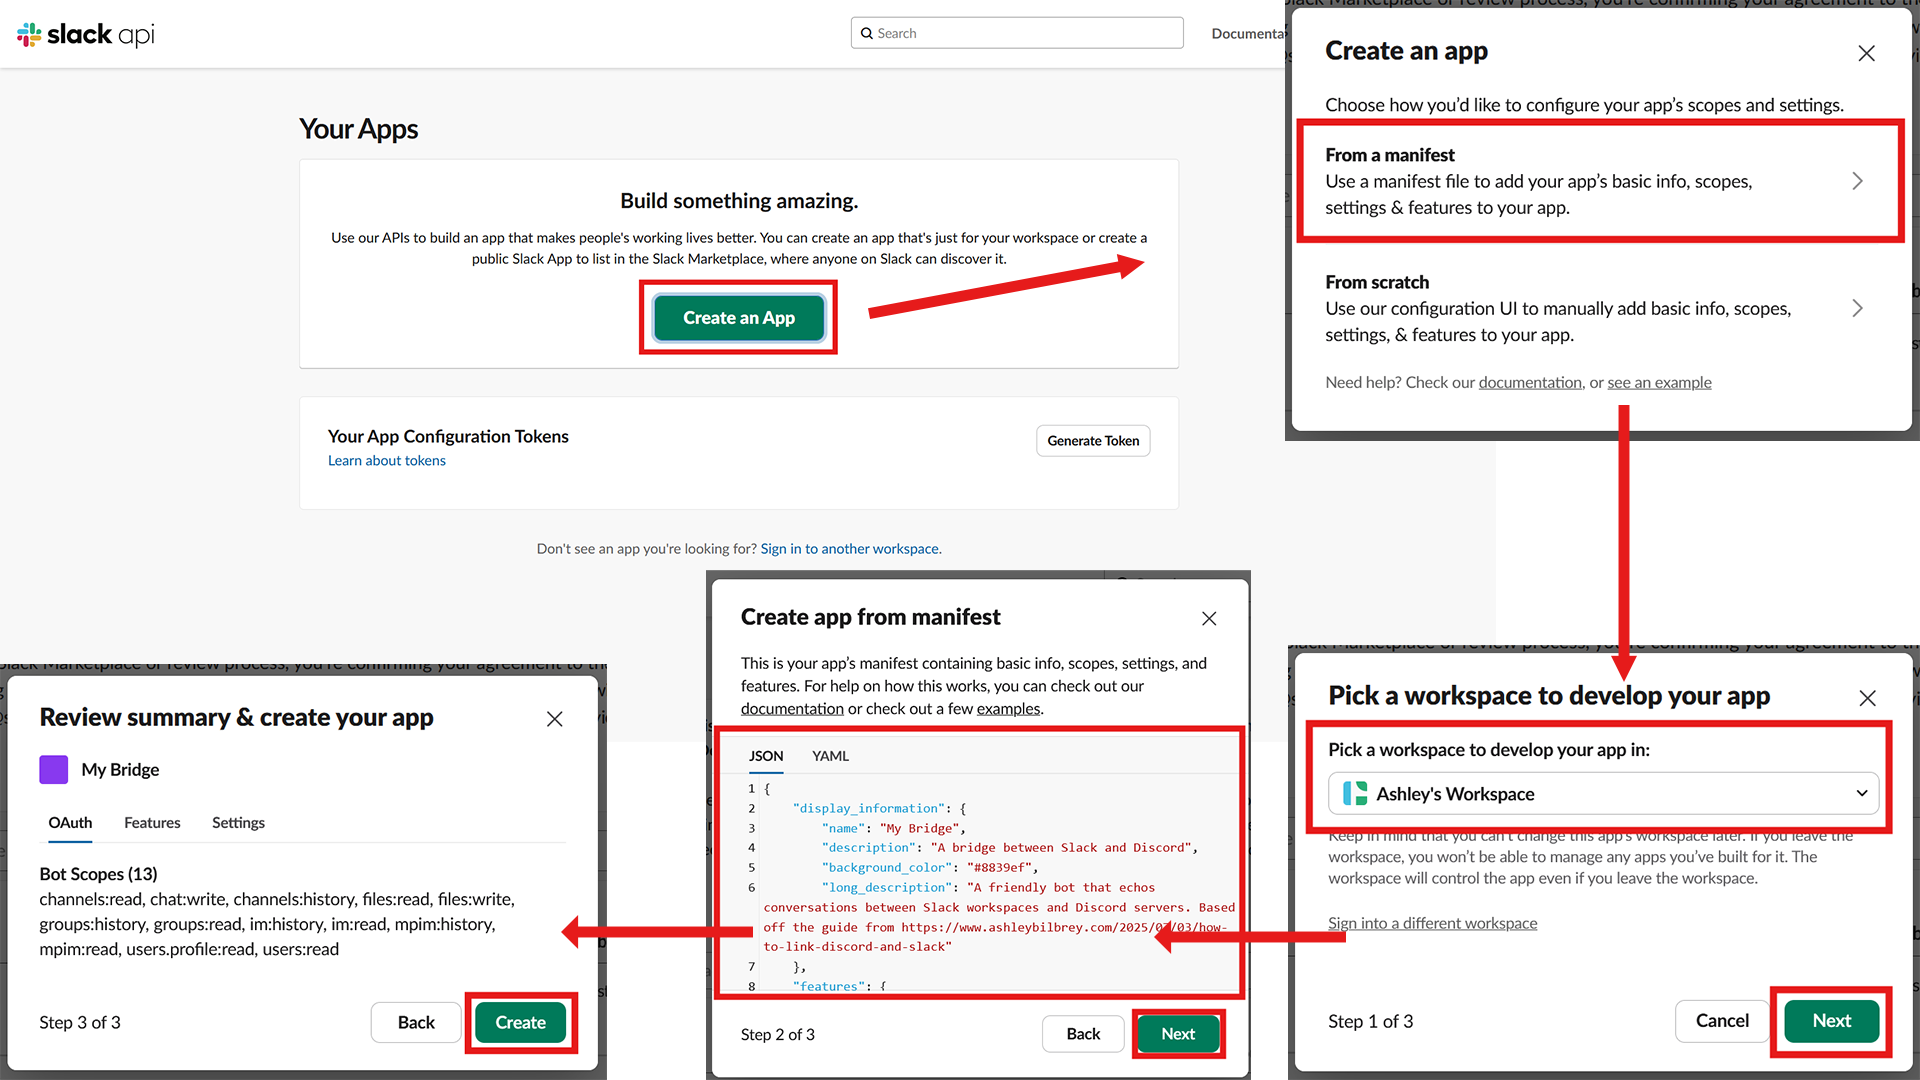
{
    "display_information": {
        "name": "My Bridge",
        "description": "A bridge between Slack and Discord",
        "background_color": "#8839ef",
        "long_description": "A friendly bot that echos conversations between Slack workspaces and Discord servers. Based off the guide from https://www.ashleybilbrey.com/2025/07/03/how-to-link-discord-and-slack"
    },
    "features": {
        "bot_user": {
            "display_name": "My Bridge",
            "always_online": false
        }
    },
    "oauth_config": {
        "scopes": {
            "bot": [
                "channels:read",
                "chat:write",
                "channels:history",
                "files:read",
                "files:write",
                "groups:history",
                "groups:read",
                "im:history",
                "im:read",
                "mpim:history",
                "mpim:read",
                "users.profile:read",
                "users:read"
            ]
        }
    },
    "settings": {
        "event_subscriptions": {
            "bot_events": [
                "channel_history_changed",
                "group_history_changed",
                "im_history_changed",
                "message.channels",
                "message.groups",
                "message.im",
                "message.mpim"
            ]
        },
        "interactivity": {
            "is_enabled": true
        },
        "org_deploy_enabled": false,
        "socket_mode_enabled": true,
        "token_rotation_enabled": false
    }
}
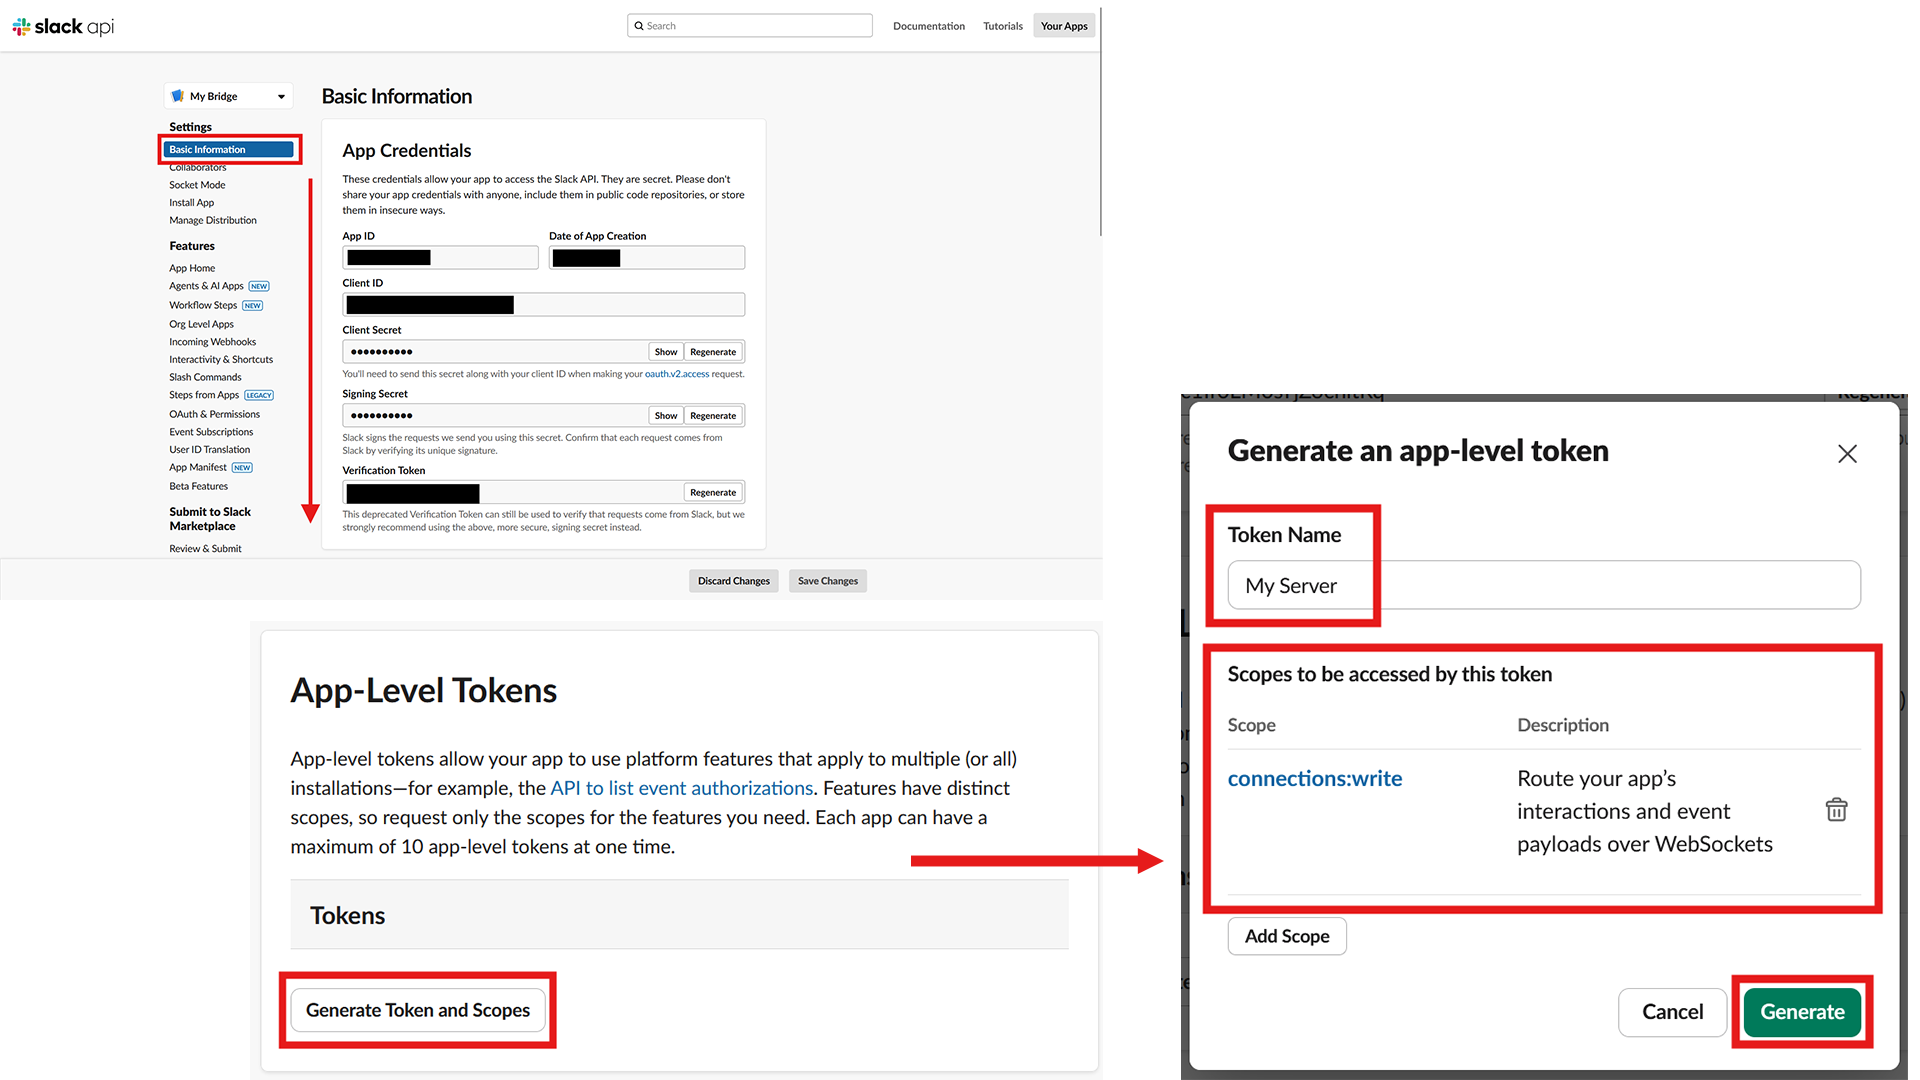
Once you’ve created the Slack application, you should end up on the “Basic Information” page. Feel free to customize the appearance of the bot here, like name and profile image.
You’ll need two tokens to use with matterbridge. From the “Basic Information” tab,
head to the “App-Level Tokens” section and click “Generate Token and Scopes”. Name
your token whatever you’d like, and give it the connections:write scope.
Copy and save the token you receive somewhere safe for later. It should start with
xapp-.
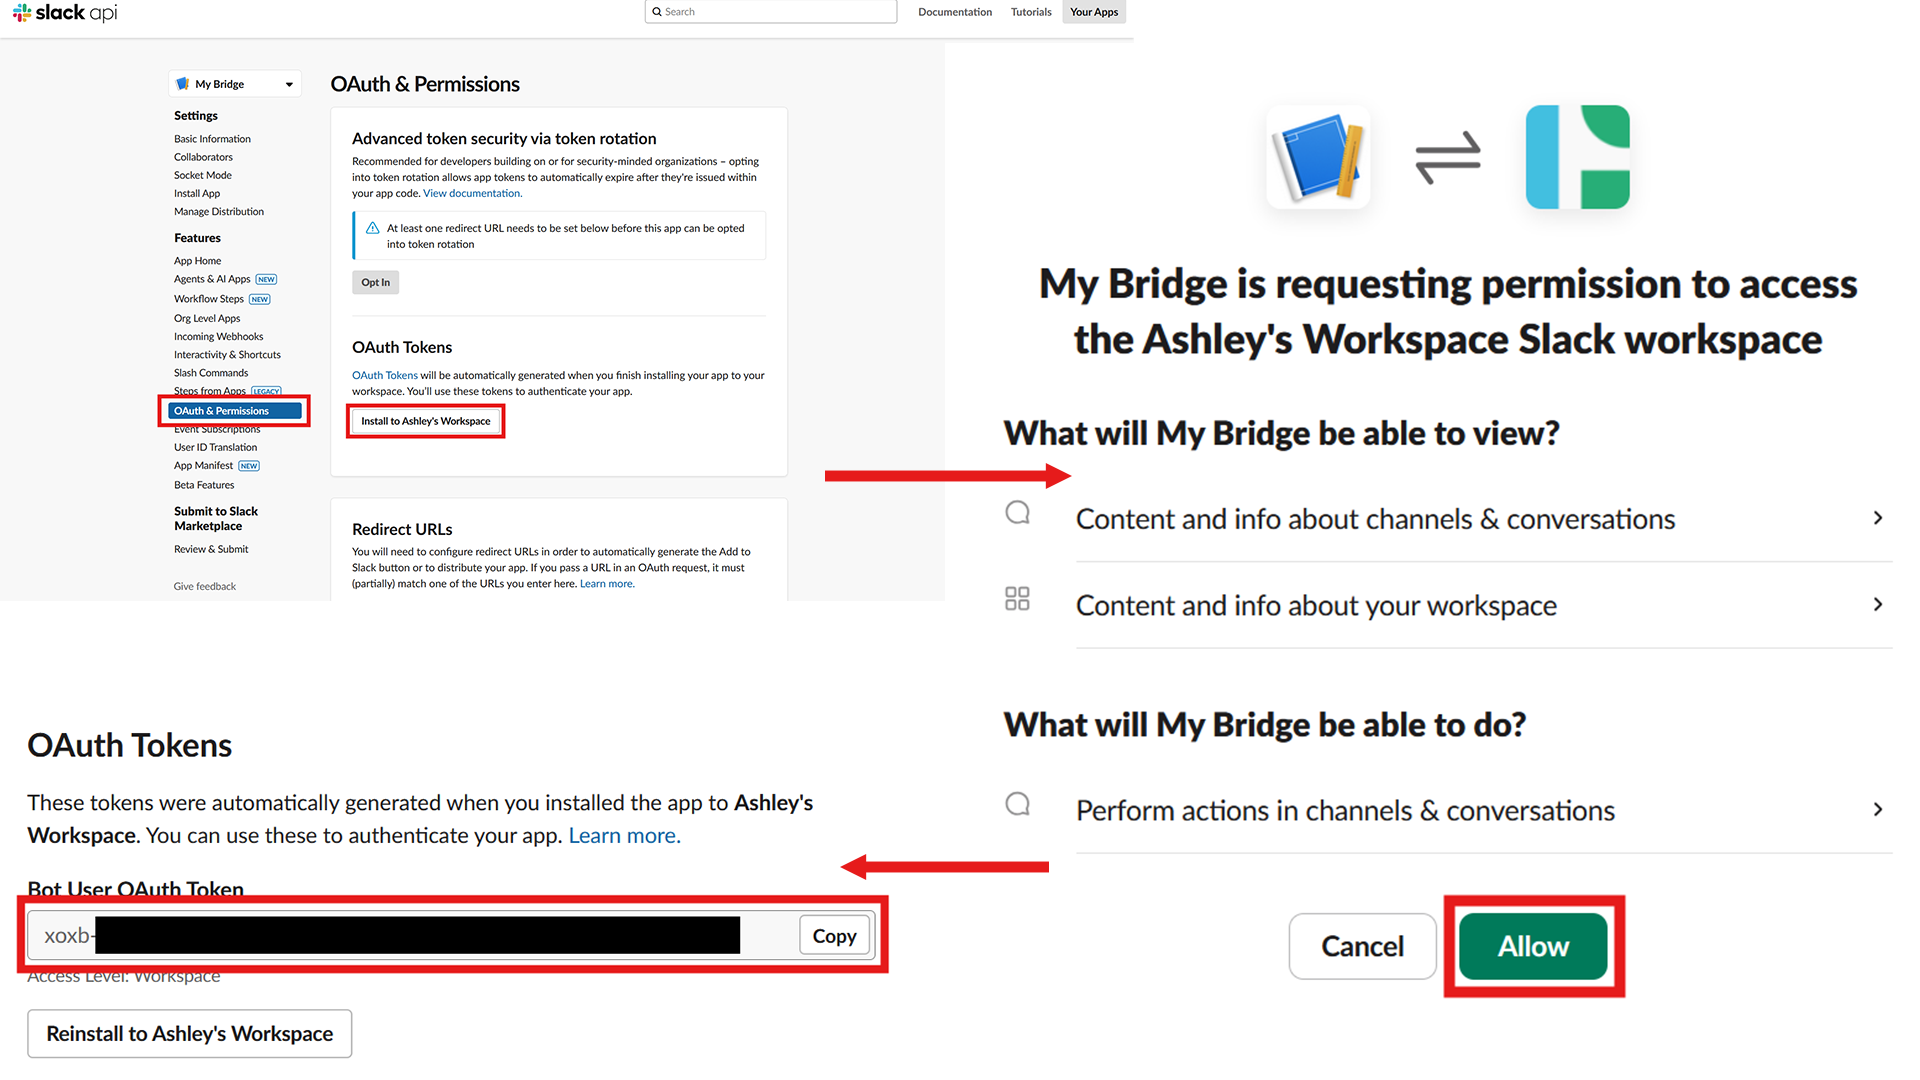
The second token you can get from the “OAuth & Permissions” tab. Install the app using the button in the “OAuth Tokens” section. If you don’t have admin permissions, you can send the request to install the app to your workspace admin. Otherwise, approve the app.
After that, you can copy the “Bot User OAuth Token” and save it somewhere safe for
later. It should start with xoxb-.
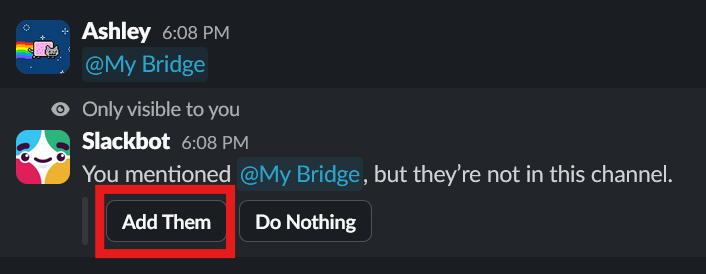
Now your Slack application should be in your workspace, like any other application or user. Make sure you invite the application to any channels you wish to bridge. An easy way to do that is to @mention the application and it should provide you with an option to add it to the channel.
Discord Setup
Now to create a Discord bot application and add it to your server.
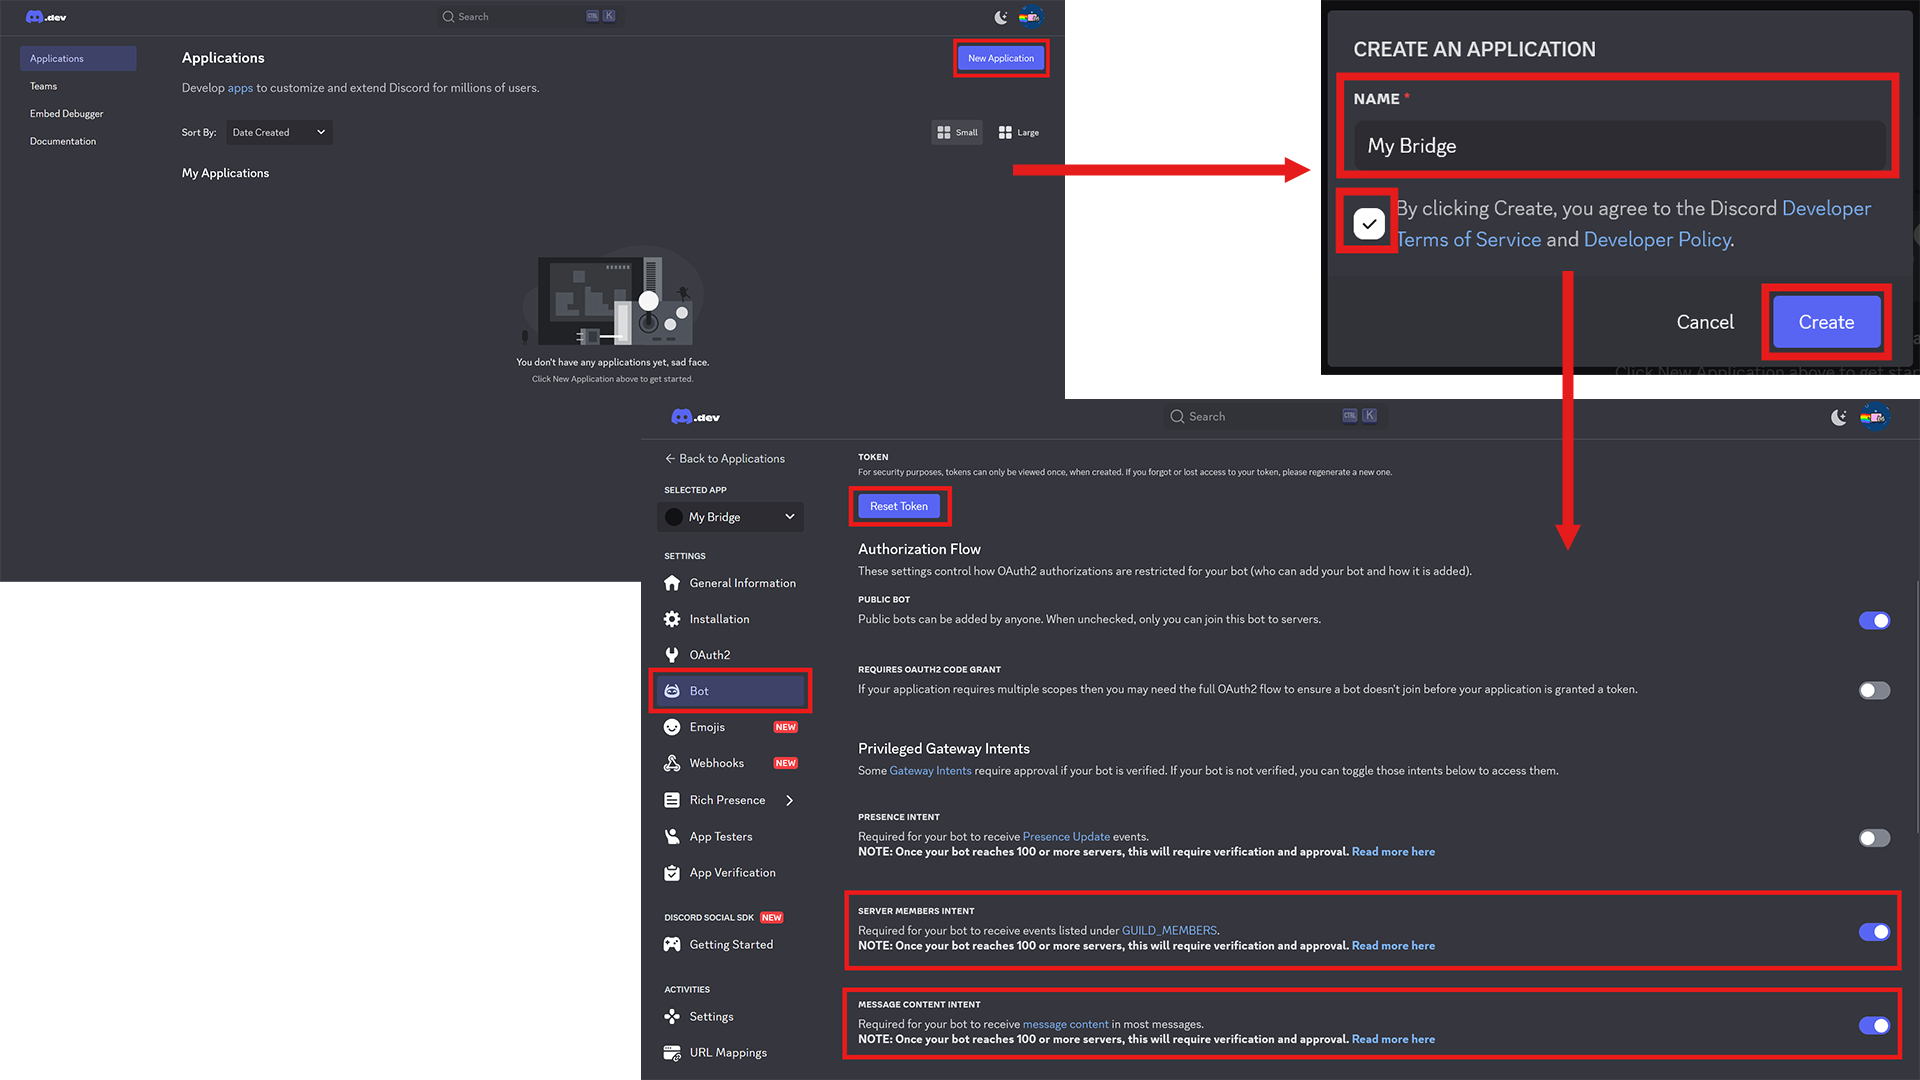
Visit the Discord Developer Portal and log in. From there, create your bridge application.
Now, click on the “Bot” tab. Here you can do some customization of how your bot appears in channels, such as adding a profile photo. Reset your bot token and copy it and save it somewhere safe for later. It should be in the JWT format and it should look like a bunch of random characters with two dots in the middle. Additionally, you need to add the privileged intents for “Server Members” and “Message Content”.
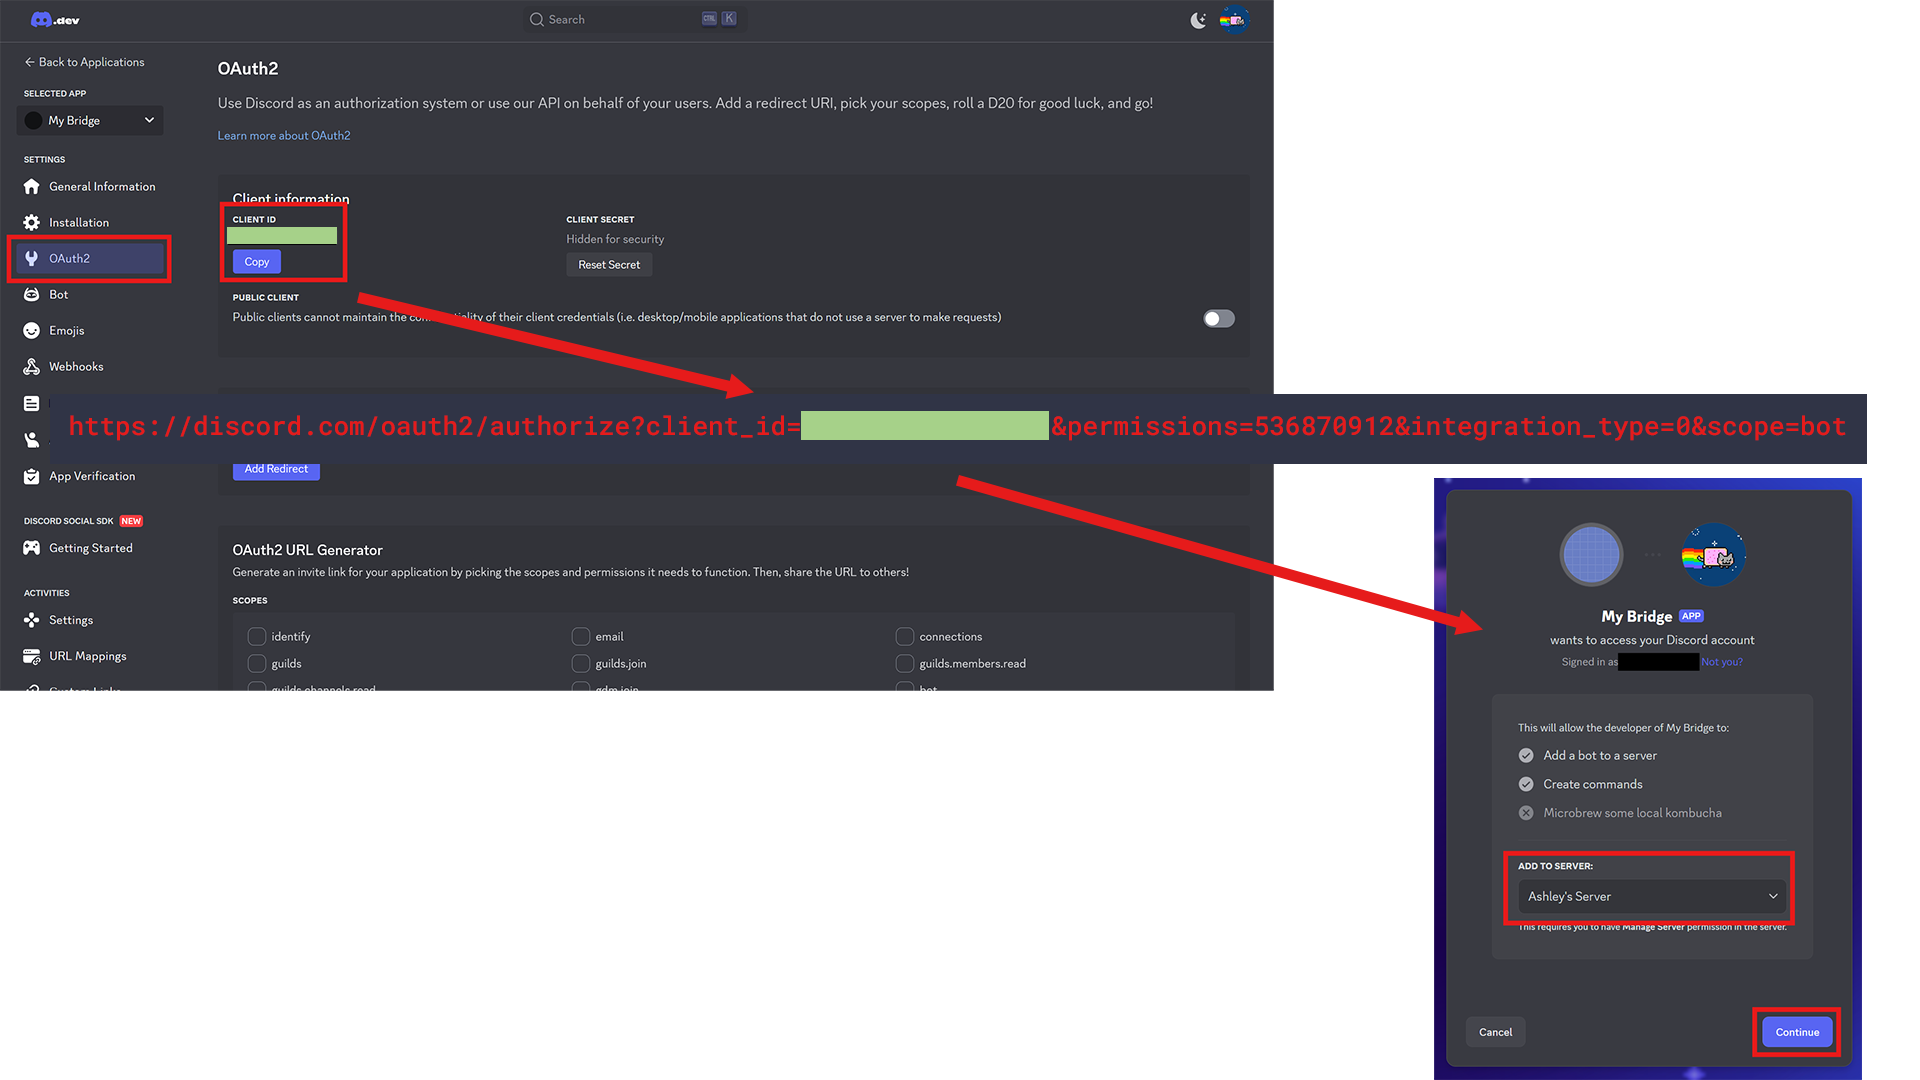
Now get your application’s Client ID from the “OAuth2” tab. Next, visit https://discord.com/oauth2/authorize?client_id=<CLIENT_ID_HERE>&permissions=536870912&integration_type=0&scope=bot,
replacing <CLIENT_ID_HERE> with the Client ID from the panel. If you don’t have
admin permissions on the server you want to bridge, you can instead send the
link to that server’s admin. Otherwise, continue adding the bot to the server
yourself.
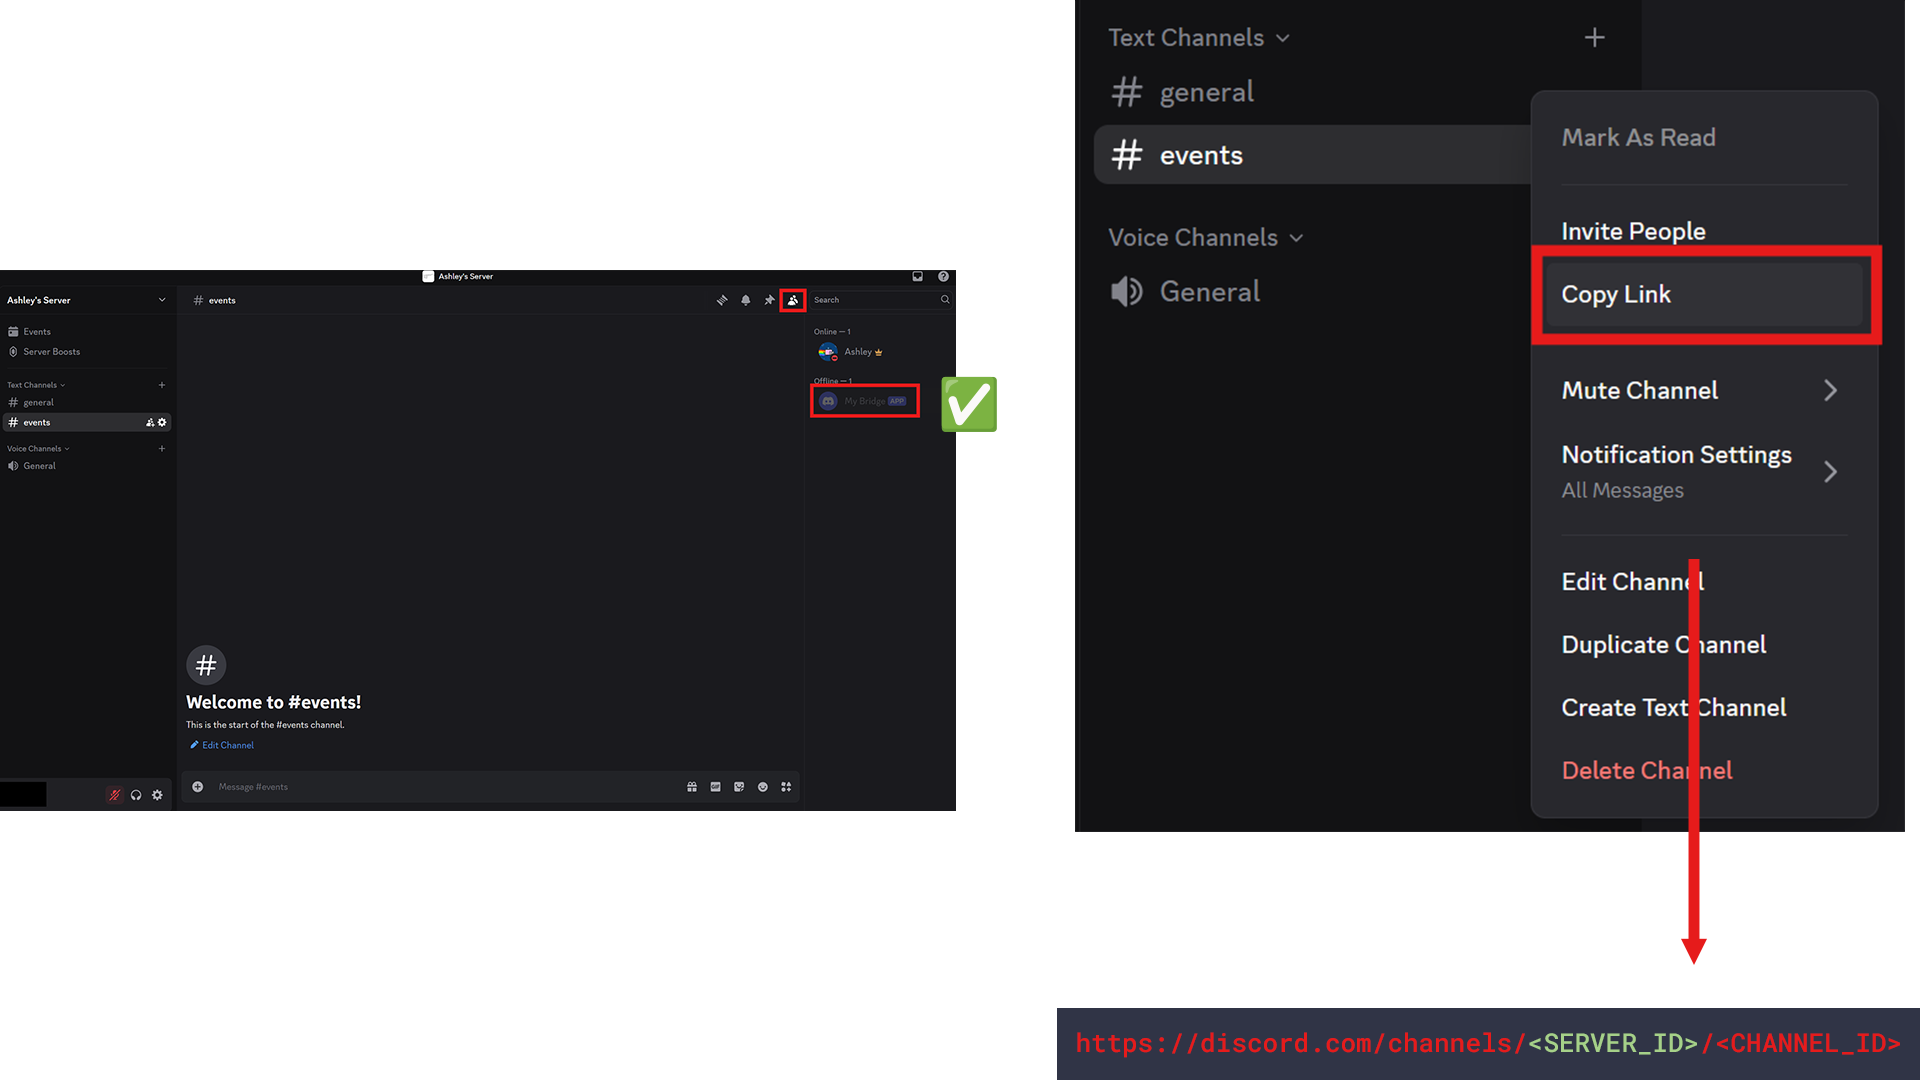
Your bot should now be in your Discord server. By default, most servers let your bot read and write in all channels. However if your server has custom roles and permissions, ensure the bot has the permissions to view and send messages in the channels you wish to bridge. One easy way to see if a bot is in a channel is to double check the sidebar.
Finally, we need to get the ID of the Discord server that is going to have the
linked channels. Find one of the channels you wish to link and right click. Then
select “Copy Link”. The link should look something like https://discord.com/channels/<SERVER_ID>/<CHANNEL_ID>.
Take the Server ID between the slashes it and save it somewhere safe for later.
Server Setup
Note: This portion of the guide temporarily has an extra step building a patched version of matterbridge due to Slack discontinuing “legacy” apps. This guide will be updated when matterbridge is fully updated to support “modern” Slack apps.
First clone the kolsys fork
of matterbridge. Open your terminal, or on Windows open PowerShell. Navigate to
a folder you’d like to locate the project with the cd command. Then use
git clone https://github.com/kolsys/matterbridge.git. to clone the matterbridge
code with kolsys’s patch into the matterbridge folder. Then use cd ./matterbridge
to navigate into the folder.
Make sure Docker is running, then use sudo docker build -t matterbridge-slack-patch .
to build the code into an image that we can run. I have run into some out-of-memory
issues building this before on one of my less powerful servers. I resolved it by
adding swap space.
Create a file in the folder called docker-compose.yml with the command
nano docker-compose.yml or notepad.exe docker-compose.yml on Windows. Feel
free to use your favorite code editor instead (like vim),
these are just the easiest options for a quick tutorial. Copy and paste this
configuration file.
services:
  matterbridge:
    image: matterbridge-slack-patch
    restart: unless-stopped
    volumes:
    - ./matterbridge.toml:/etc/matterbridge/matterbridge.toml:ro
    command: ["/bin/matterbridge", "-conf", "/etc/matterbridge/matterbridge.toml"]
With nano, save by using Ctrl + O then Enter and then exit by using Ctrl + X. With Windows
Notepad, save by using Ctrl + S, then exit with Alt + F4. This configuration file
tells Docker how we want the image to be run in a container.
Create a file in the folder called matterbridge.toml by running nano matterbridge.toml
in the terminal. Copy and paste this configuration file.
[slack]
[slack.myworkspace]
Token="xoxb-**********-*************-************************"
AppToken="xapp-*-***********-*************-****************************************************************"
PrefixMessagesWithNick=true

[discord]
[discord.myserver]
Token="**************************.******.**************************************"
Server="******************"

[general]
RemoteNickFormat="[{PROTOCOL}/{BRIDGE}] <{NICK}> "

[[gateway]]
    name = "mygateway-general"
    enable=true

    [[gateway.inout]]
    account = "discord.myserver"
    channel = "general"

    [[gateway.inout]]
    account = "slack.myworkspace"
    channel = "general"

[[gateway]]
    name = "mygateway-events"
    enable=true

    [[gateway.inout]]
    account = "discord.myserver"
    channel = "events"

    [[gateway.inout]]
    account = "slack.myworkspace"
    channel = "events"
Inside the quotes where it says Token and AppToken in the Slack section,
replace it with the Slack tokens that were saved earlier. Where it says Token
and Server in the Discord section, replace it with the token and server ID that
were saved earlier. 🚨 As a side note, it’s important to keep these tokens safe.
If these tokens were to fall into the wrong hands, someone could read private
messages in your channels, or send spam. 🚨
This config file is an example that links the #general and #events channels. Customize your configuration file to use which names and channels you wish. You can also add additional gateways.
With nano, save by using Ctrl + O then Enter and then exit by using Ctrl + X. With Windows
Notepad, save by using Ctrl + S, then exit with Alt + F4. This configuration file
tells matterbridge the authentication tokens to log in, and which channels to
link together.
You can now run everything by using the command docker compose up -d while your
terminal is in the matterbridge folder. Everything should now be running! You
can stop running matterbridge by using docker compose down. You can use
docker compose logs to check the logs and debug if there are any errors.
Conclusion
Your Discord channels and Slack channels should now be linked 🎉! Messages you send in Discord should be replicated in Slack, and messages you send in Slack should be replicated in Discord.

With matterbridge, you can bridge more than just Slack and Discord. Visit the matterbridge wiki for more information.
Thank you to the free and open source contributors to matterbridge, and especially kolsys for making the “modern” Slack app patch. Contributors like these help keep modern technology running. Now go do something today to make the world a better place!