<?xml version="1.0" encoding="utf-8"?><feed xmlns="http://www.w3.org/2005/Atom" ><generator uri="https://jekyllrb.com/" version="3.10.0">Jekyll</generator><link href="https://www.ashleybilbrey.com/feed.xml" rel="self" type="application/atom+xml" /><link href="https://www.ashleybilbrey.com/" rel="alternate" type="text/html" /><updated>2026-01-15T01:53:46+00:00</updated><id>https://www.ashleybilbrey.com/feed.xml</id><title type="html">Ashley Bilbrey</title><subtitle>Ashley Bilbrey is a Security and Software Engineer dedicated to impactful work.</subtitle><entry><title type="html">Everything I Know About Cycling for Transportation</title><link href="https://www.ashleybilbrey.com/posts/2026/01/14/everything-i-know-about-cycling-for-transportation/" rel="alternate" type="text/html" title="Everything I Know About Cycling for Transportation" /><published>2026-01-14T00:00:00+00:00</published><updated>2026-01-14T00:00:00+00:00</updated><id>https://www.ashleybilbrey.com/posts/2026/01/14/everything-i-know-about-cycling-for-transportation</id><content type="html" xml:base="https://www.ashleybilbrey.com/posts/2026/01/14/everything-i-know-about-cycling-for-transportation/"><![CDATA[<p>Throughout my life I’ve mountain biked, road biked, and also cycled for transportation. It’s fun, it’s good for you, <a href="https://web.archive.org/web/20250320173505/https://ehp.niehs.nih.gov/doi/10.1289/ehp.0901747">less dangerous</a> than some might think, and good for the environment. Plus, it’s pretty efficient and economical, you can go <a href="https://www.heavycivilbigdata.com/miles-per-burrito.html">miles on a burrito</a>.</p>

<p>My goal for this post isn’t to try to convince people to cycle for transportation, but I want to share everything I’ve learned to make cycling easier for others. My target audience is for new or mildly experienced cyclists for transportation in the United States. I’ll also have a small focus on Davis, California, where I <a href="https://cs.ucdavis.edu/news/outstanding-senior-spotlight-ashley-bilbrey">went to college</a> and a place <a href="https://en.wikipedia.org/wiki/Davis,_California#Bicycling">known for bicycling</a>.</p>

<h2 id="acquiring-a-bike">Acquiring a Bike</h2>

<h3 id="the-bike-you-already-have">The Bike You Already Have</h3>
<p>While different bicycle designs have pros and cons, by far the best bike is the one you already have. Maybe you have one sitting around somewhere, or you can borrow one from your parents, or a friend who isn’t using theirs. If it’s in some disrepair, you can learn to fix it, or bring it to your local bike shop. It’s probably the most economical decision and involves the least commitment.</p>

<h3 id="the-ideal-bike">The Ideal Bike</h3>
<p>If you are to get a new bike, a city bike has everything you need. Known as a <a href="https://en.wikipedia.org/wiki/Utility_bicycle">utility bike</a>, Dutch bike, Omafiets, or a <a href="https://www3.nhk.or.jp/nhkworld/en/shows/2032334/">Mamachari</a>, this style of bike has evolved over years to be the most efficient and rugged</p>

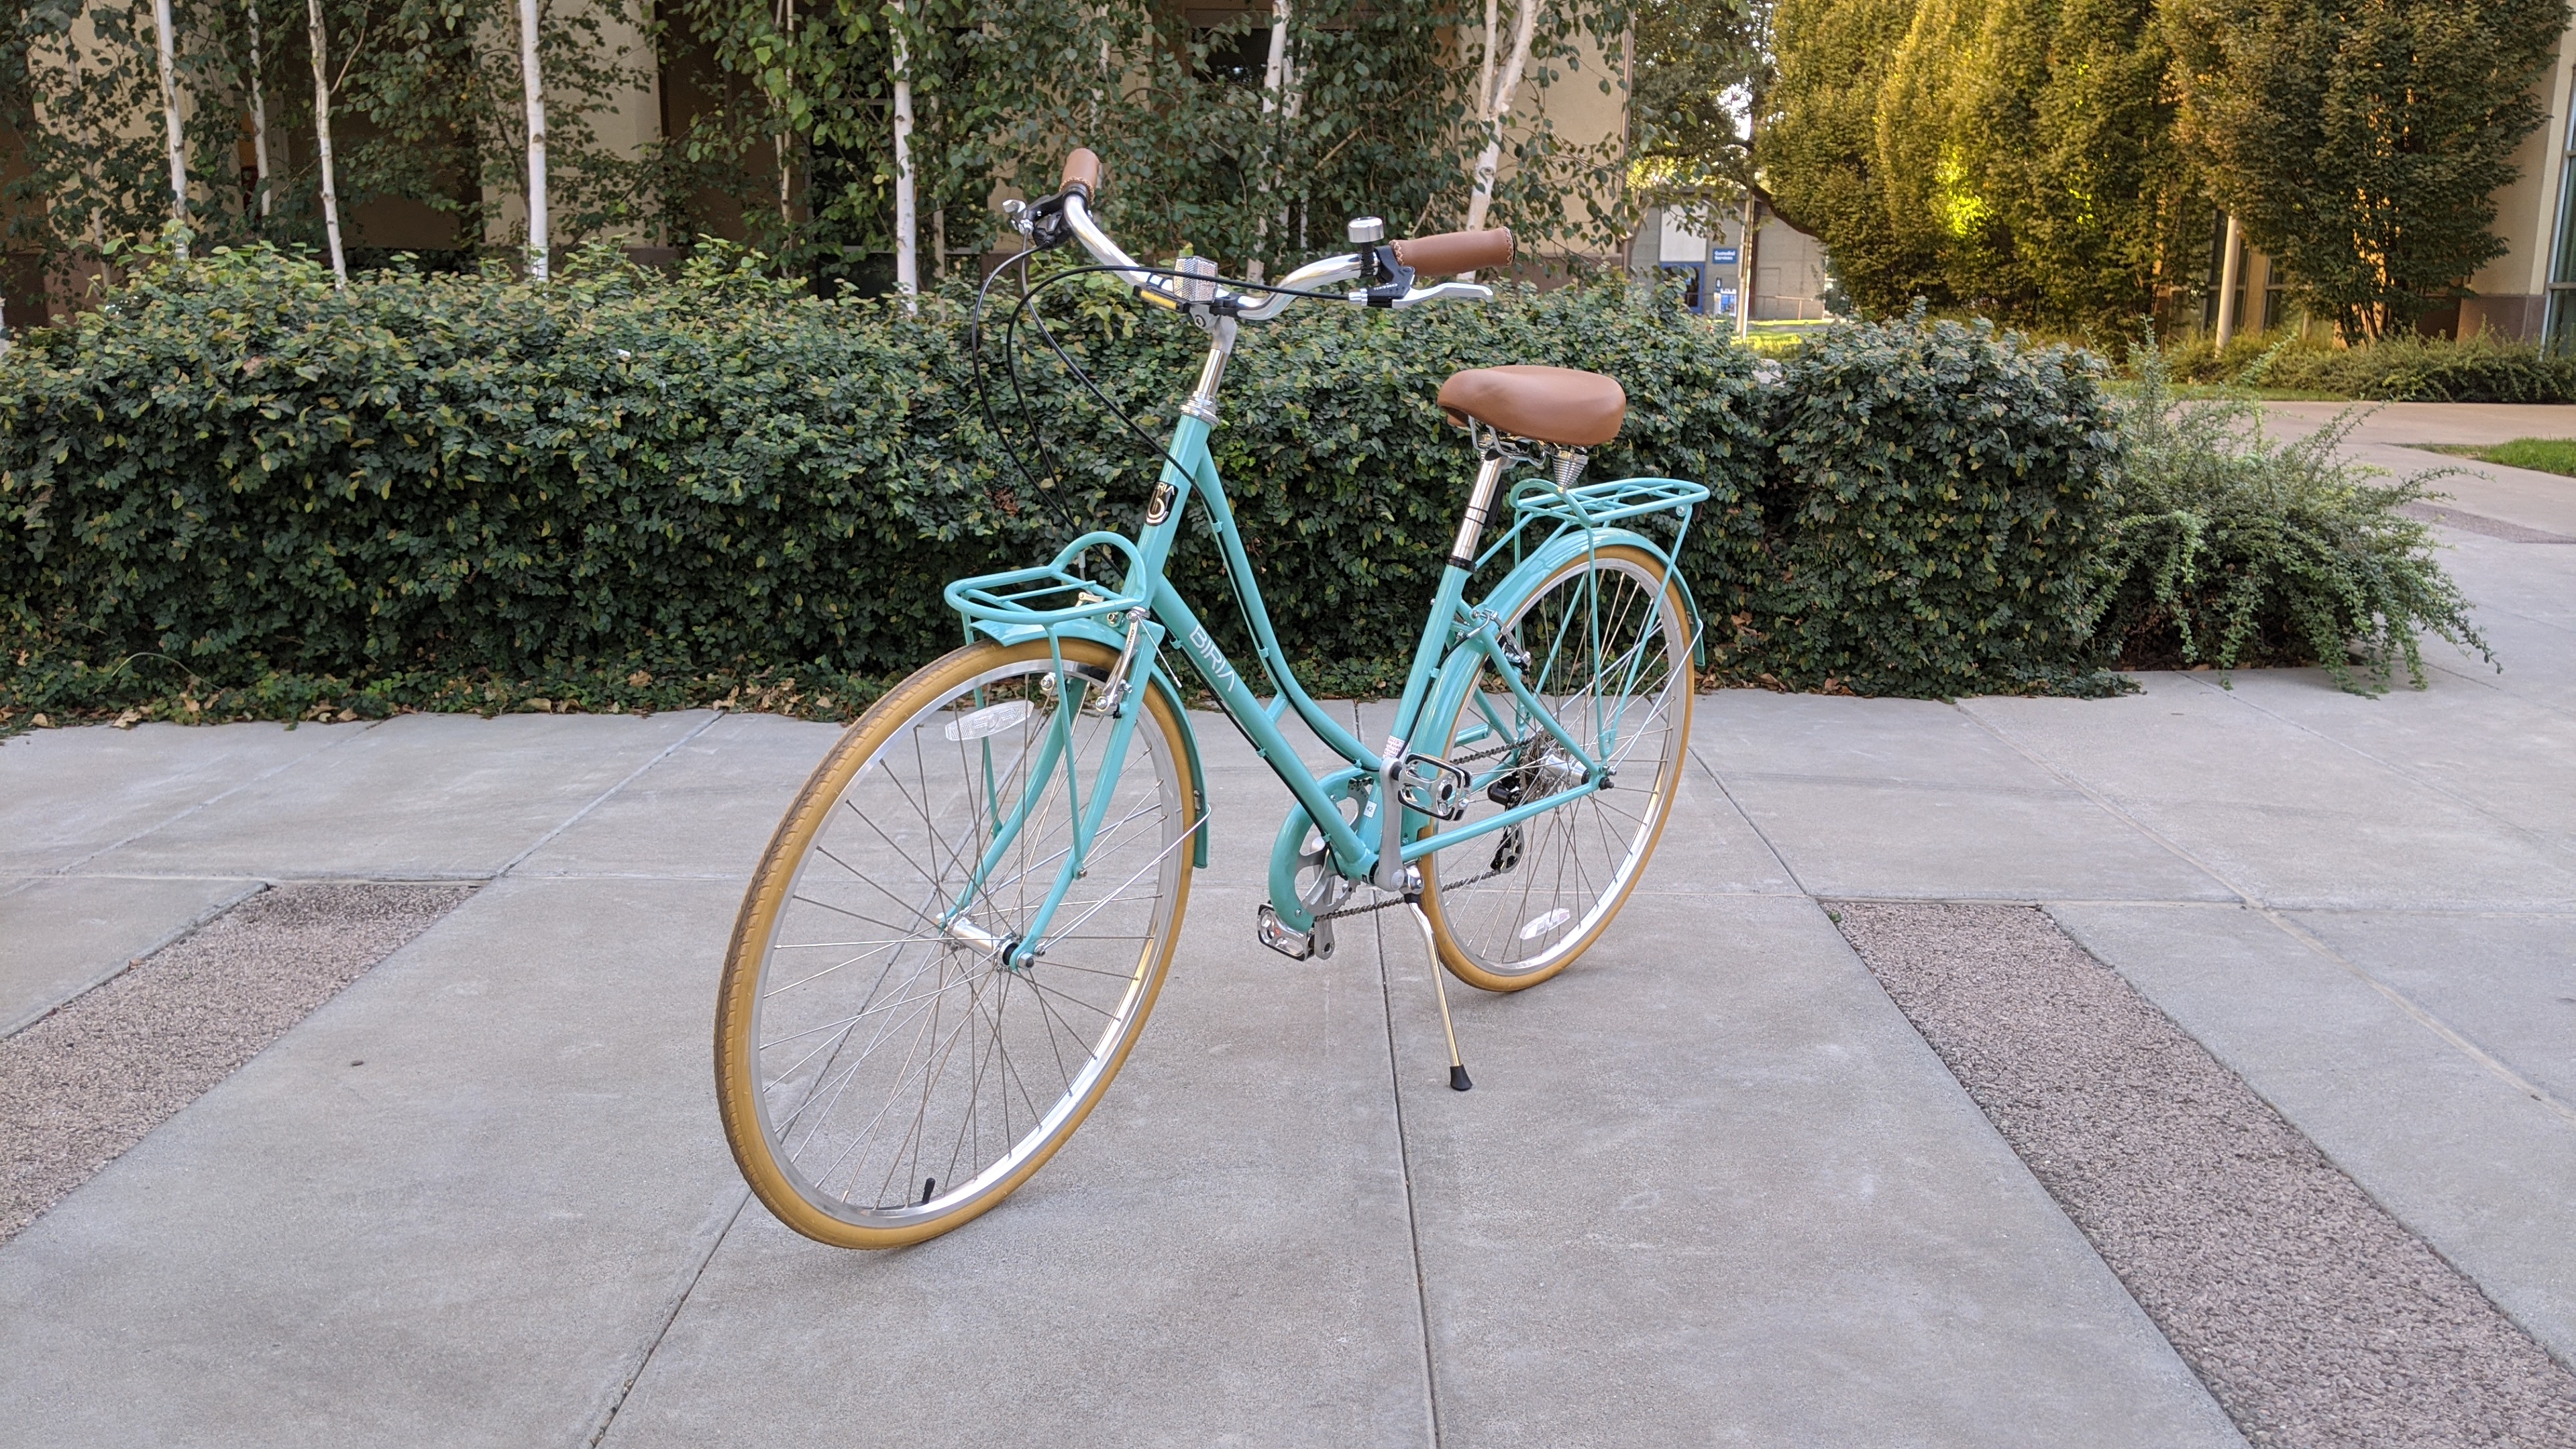
<p>Here’s my Biria CitiBike, an Italian-made Dutch bike I’ve been using for 5 years strong now. Some people may confuse this style bike for a beach cruiser. While it has some similar elements, there are also some key differences.</p>

<p><img src="/public/img/2026/01/14/biria-citibike.jpg" alt="A teal city bike in front of some plants. The text Biria is in white text on the down tube." /></p>

<p>The main benefit of a good utility bike are narrow tires. As such an efficient mode of transportation, bikes are prone to any form of resistance. While won’t go too deep into the physics principles, at the lower speeds in cycling for transportation, rolling resistance is the best optimization to make. A more narrow tire means less tire is making contact with the ground, which leads to less rolling resistance. Less rolling resistance means it’s less tiring to bike around.</p>

<p>Utility bikes have a comfortable sitting position. The geometry of the bike has the rider seated upright, which allows for comfort while biking longer distances. The more flat, or “sweeper”, handle bars are also much more comfortable to hold on to, and requires less weight on the riders hands.</p>

<p>Most utility bikes have some form of “step down” frame. This makes it quick and easy to get on and off the bike.</p>

<p>Utility bikes often have a lot of options for storage space. My city bike has both front and back racks. There are also lots of customization options, like front and back baskets that I have used at different times.</p>

<p>City bikes often have mud guards. If the roads are wet, this prevents water from coming up from the wheels and splashing you.</p>

<p>Some utility bikes have lights pre-installed. They have dynamos as part of the wheel assembly, which generates electricity while you bike so the light is always on. You’ll never need to remember to carry bike lights with you or charge them.</p>

<p>An under rated feature of utility bikes are chain guards. These help prevent clothing such as jeans from getting chewed up in the chain and gears.</p>

<p>Finally, durability is an important aspect of a good utility bike. While it’s harder to determine a bike’s durability at face value, check reviews and ensure you’re buying from a reputable company.</p>

<h3 id="bikes-to-avoid">Bikes to Avoid</h3>
<p>Brands that you might find in Walmart or Target may be cheap and convenient, but I would choose to avoid them. They are not known for their durability, and often break down at inconvenient times. If you go to a local bike shop instead, you’d be supporting a local business, have experienced people helping you make a purchase decision, and you’ll be more familiar with a place you can go for major repairs.</p>

<p>Similarly, buying a bike on Amazon carries similar risks. There are many discount brands where quality is difficult to determine.</p>

<p>If you can help it, avoid mountain bikes. The United States is obsessed with mountain bikes, and while I love them too, they don’t make good options for transportation. The wider tires and suspension system increase rolling resistance, meaning a lot more energy is expended mountain biking. If you are a fan of mountain biking, I’d recommend having two bikes that are good for each purpose, instead of one bike that isn’t very good for either.</p>

<h3 id="a-used-bike">A Used Bike</h3>
<p>Most bikes, with some maintenance, are good for a lifetime. Buying a used bike is good for the environment, and cheaper too.</p>

<p>I’d look primarily at bicycle co-ops, exchanges, and bike stores specializing in used bikes. These places usually look over the bikes and make sure they are in good condition before selling them. For instance in Davis, there is the <a href="https://greenbicycledepot.com/">Green Bicycle Depot</a>. In Silicon Valley, there is a cool place called the <a href="https://bikex.org/">Bike Exchange</a>, where the proceeds on bike sales go towards giving bikes to people in need.</p>

<p>Bike swaps and auctions are also good choices. In Davis, abandoned bikes are put up for <a href="https://transportation.ucdavis.edu/auction">auction</a>, and the local elementary school has an annual <a href="http://www.davisbikeswap.org/">bike swap</a>. In Silicon Valley, there is a similar bike swaps and sales conducted by the <a href="https://bikex.org/">Bike Exchange</a>.</p>

<p>Additionally there are sites like <a href="https://craigslist.org">Craigslist</a>. However, make sure to be careful when purchasing bikes from locations like these. It’s difficult to ensure the bike is in good condition, especially when many bikes sold on these sites have been sitting for long periods of time. While you can get a good deal on these sites, many deals are to good to be true. Sites like these are the most common place for stolen bikes to be sold. Before buying, check the serial number (usually located on the bottom of the bike near the pedals) on <a href="https://bikeindex.org/">Bike Index</a>, and make sure it isn’t labeled as stolen. See more about <a href="#registration">bike registration</a>.</p>

<h3 id="e-bikes">E-bikes</h3>
<p>Combining technology and sustainability in a fun package make e-bikes a fantastic invention. While you don’t <em>need</em> and e-bike, it’s certainly an option. E-bikes still get you outside, get you moving, are sustainable, and can extend your comfortable trip range.</p>

<p>While there are a lot of attractive cheap e-bike options out there, many are unsafe. Ensure your bike us <a href="https://www.ul.com/services/e-bikes-certificationevaluating-and-testing-ul-2849">UL 2849</a>, ETL, or similarly certified. This ensures your bike is designed properly, and won’t spontaneously combust. Don’t be that person that buys a cheap e-bike that catches fire, and gets e-bikes banned from your apartment complex or city.</p>

<p>The laws for e-bikes in the United States are <a href="https://www.youtube.com/watch?v=bB6hBLmBhPA">needlessly complex</a>, but in most places Class 1 and Class 2 e-bikes have the same rights and responsibilities as acoustic bikes. These are limited to 20 miles per hour and 750 watts. Faster and more powerful bikes go into Class 3 or moped territory, which are more restricted. Check your local laws and make sure you know what is allowed before you buy. See more about <a href="#following-bike-laws">bike laws</a>.</p>

<p>When choosing between features of e-bikes, one of the main options are between hub motors and mid-drive. The mid drive option, such as a <a href="https://www.bosch-ebike.com/en/products/drive-unit/">Bosch motor</a>, is more expensive. However, it provides a really smooth riding experience. A mid-drive motor is proportional to pedal strength, where a hub motor can have some delay before it kicks in.</p>

<p>I think most city bicycles can handle most shopping trips just fine. However, electric cargo bikes (or “<a href="https://www.youtube.com/watch?v=rQhzEnWCgHA">bakfiets</a>”) are an option. They are good for much larger shopping trips, taking children with you, or an option for households looking to replace a second car. There are some mid-range options like Rad Power Bikes, or a higher end option like the <a href="https://www.cagobike.com/en">Ca Go</a>.</p>

<h2 id="riding-your-bike">Riding Your Bike</h2>
<p>The fun part!</p>

<h3 id="keep-it-casual">Keep It Casual</h3>
<p>You don’t need to be super serious about your biking. For instance, you don’t need to pedal super hard and get winded or sweaty. More effort has diminishing returns in terms of speed output, and a few miles per hour faster won’t get you to your destination much faster. Biking casually still carries health benefits as well.</p>

<p>Additionally, dress for the destination, not the journey. You don’t need to dress like a “cyclist”. Dressing in tight fitting clothing for aerodynamics have limited benefits at the lower speeds for transportation cycling. With a few <a href="#preparing-for-weather">exceptions</a>, dress how you would normally for work, school, or wherever you’re going. That way, you can just hop off, <a href="#locking-your-bike">lock your bike</a>, and continue on with your day.</p>

<h3 id="following-bike-laws">Following Bike Laws</h3>
<p>In the United States, cyclists have the same rights and responsibilities as cars, with a few exceptions. This means you must travel on the right side of the road, stop at stoplights, yielding to pedestrians, and follow any other road rules.</p>

<p>In some states (though <a href="https://www.sfgate.com/california-politics/article/idaho-stop-vetoed-newsom-16589004.php">not California</a>), people on bikes can conduct an “Idaho stop”. This is where stop signs can be treated as yield signs. This is <a href="https://doi.org/10.1016/j.trc.2024.104754">statistically safer</a> because it reduces the amount of time a bike spends in an intersection, which is the most dangerous place for bikes.</p>

<p>It usually varies city-by-city on if riding your bike on the sidewalk is legal. For instance in <a href="https://transportation.ucdavis.edu/bicycleprogram/rulesoftheroad">Davis</a>, cycling on sidewalks is prohibited on campus, prohibited downtown, but generally permitted everywhere else. You should note that drivers generally don’t check for cyclists on sidewalks, so be careful and check behind you to see if any cars might be turning.</p>

<p>In California, you’re supposed to stick to the right side of the road and use the bike lane, however in a significant number of cases there are <a href="https://www.calbike.org/go_for_a_ride/california_bicycle_laws/#toggle-id-1">exceptions</a>. If you’re trying to reach the left turn lane, you don’t need to stick right. If you are avoiding a hazard, you don’t need to stick right. If there’s no bike lane, you can “take the lane” if the car lane is to narrow to safely share for both a car and a bike, which is almost always the case.</p>

<h3 id="hand-signals">Hand Signals</h3>
<p>Cyclists, like cars, should indicate which direction they are turning. The <em>traditional</em> hand signals have you extend your left arm to indicate turning left, and extend your left arm as an L to indicate turning right. However, I think the <em>traditional</em> hand signals are confusing, antiquated, and rooted in the problematic origin of automobiles in the United States. If you want to make it more clear where you’re going, instead extend your right arm out to indicate you are turning right.</p>

<p>The ultimate way of indicating where you are going is pointing to where you are going. Turning right? Point right. Turning left? Point left. Exiting the roadway at that one driveway over there? Point to it! You aren’t a car, you don’t need to strictly adhere to traditional left and right signals. Pointing is quickly recognizable and provides much more clarity to where you are going.</p>

<h3 id="the-abc-pre-ride-check">The ABC Pre-Ride Check</h3>
<p>The ABC pre-ride check is something I picked up from mountain biking as a kid, but I still do it because it saves me from time to time. It’s a quick 10 second check you can do before your ride. A stands for Air. Take a quick squeeze of both of your tires and make sure that they seem properly inflated. B stands for Brakes. Squeeze your front brake, and push the bike forwards. Make sure it adding stopping force. Now do the same with the other brake. Finally, C is for Chain. Do a quick visual inspection and make sure the chain and the gears it is touching look like they are where they are supposed to be.</p>

<h3 id="learn-to-use-your-gears">Learn to Use Your Gears</h3>
<p>Most bikes come with some gears, but I’ve seen a lot of people go around way too low of a gear. Learn how to shift up and down. Shifting down before you reach a hill will make it easier to climb the hill. On flats, find a nice middle gear so it’s not too hard to bike, but you’re also not spinning the pedals too much.</p>

<h3 id="bike-circles">Bike Circles</h3>
<p>Bike circles are roundabouts, but for bikes. You can find college students navigating these on the UC Davis campus. The rules are basically the same as a roundabout for cars. In the United States, travel goes counter-clockwise around the bike circle. People outside of the bike circle should yield to people already in the bike circle. When you leave the bike circle, move to the outside and then <a href="#hand-signals">point</a> to where you are exiting. Don’t be that person who goes the wrong way around the circle, or forces someone inside the circle to slam on their brakes!</p>

<h3 id="route-choice">Route Choice</h3>
<p>Bike infrastructure in the United States is extraordinarily lacking. I try to avoid as much risk as possible, so the route I choose is the main thing to make my trip safer. I pre-plan my routes before I bike. I prioritize separated bike lanes, low traffic roads, and anywhere that avoids interaction with cars.</p>

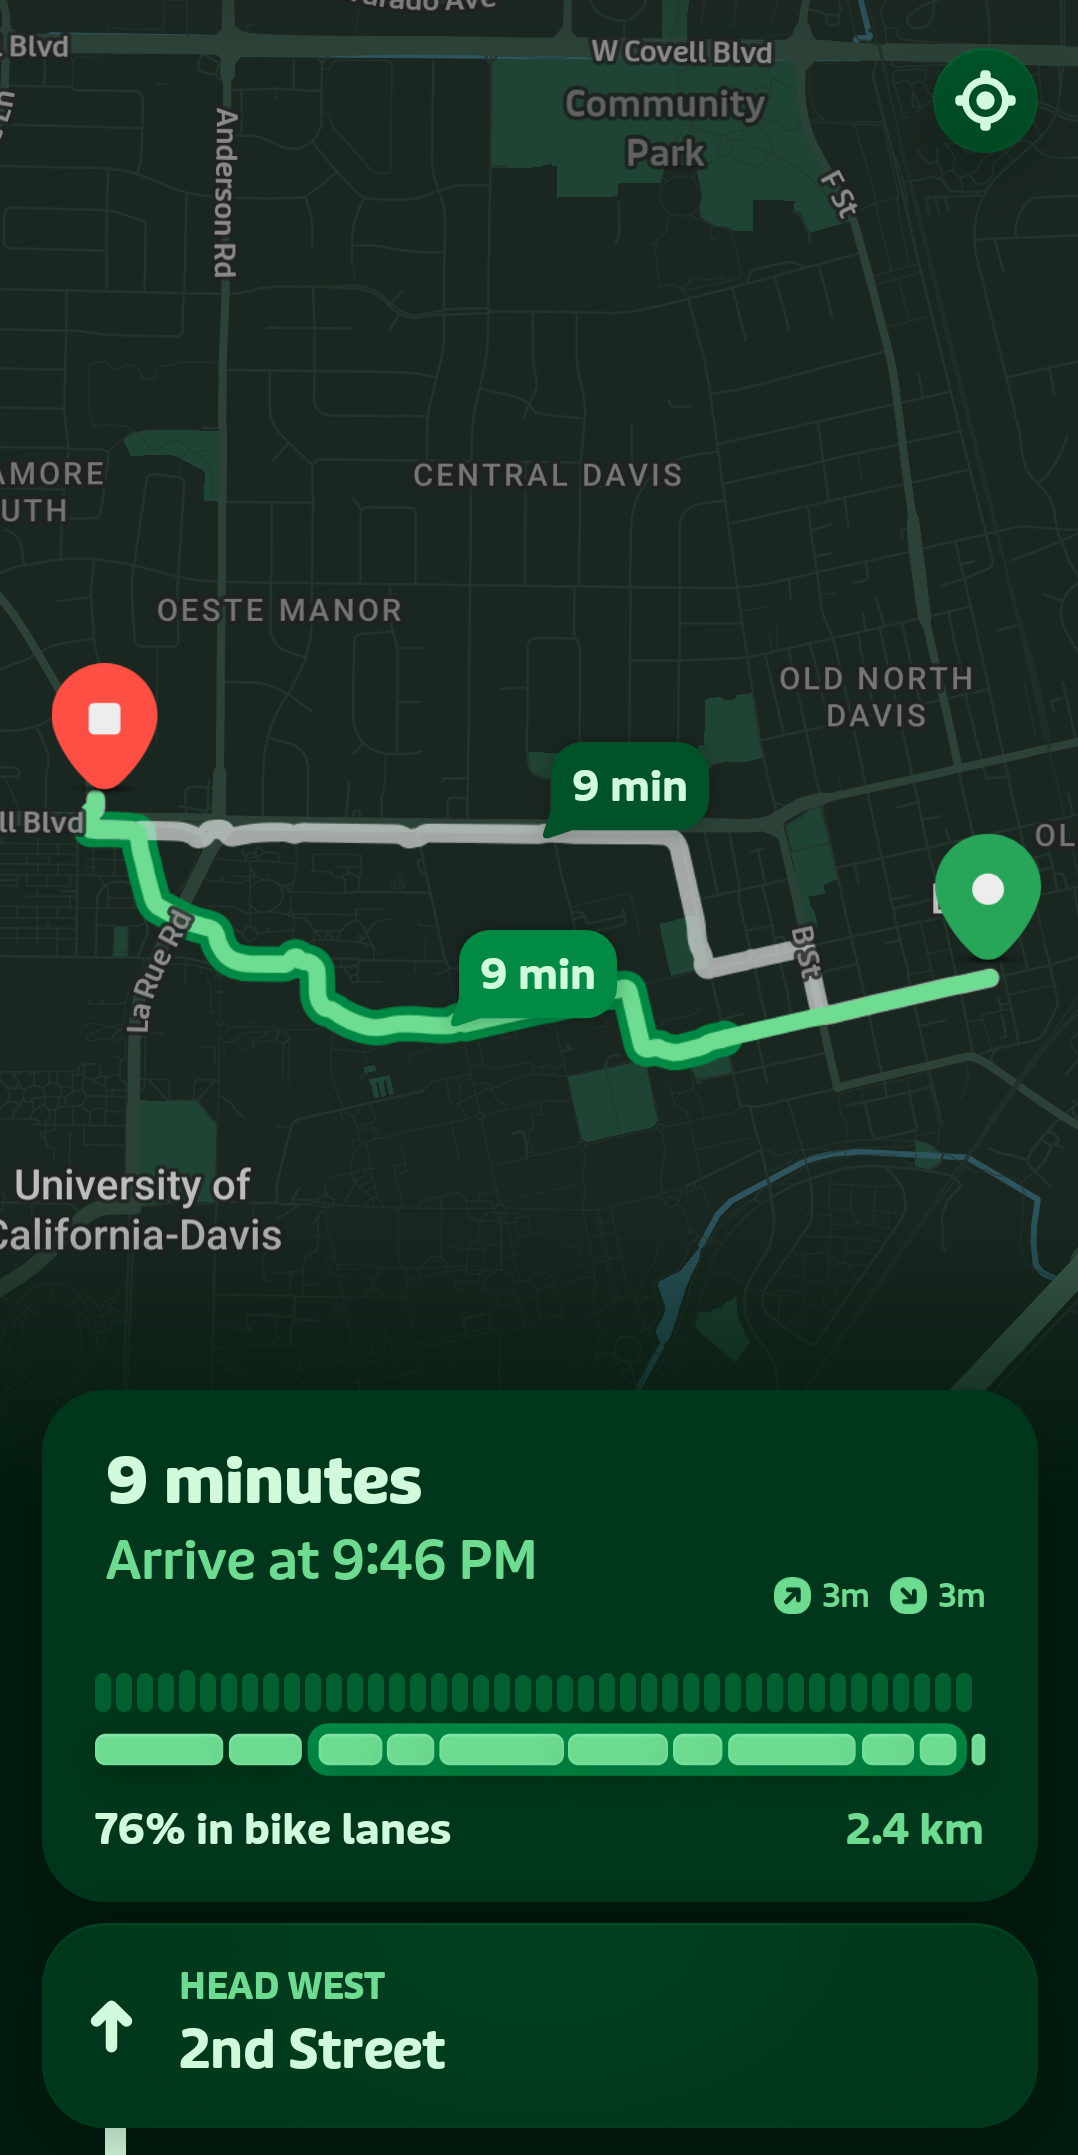
<p>I’ve found the <a href="https://transitapp.com/">Transit App</a> has pretty good biking directions that prioritize safer routes. Google Maps is okay, but usually prioritizes a more direct but dangerous route.</p>

<p><img src="/public/img/2026/01/14/transit-app-screenshot.png" alt="A screenshot of the Transit App, showing a bike route through Davis, California, indicating 76% in bike lanes." /></p>

<h2 id="biking-gear">Biking Gear</h2>

<h3 id="preparing-for-weather">Preparing for Weather</h3>
<p>A lot of people have valid concerns about the weather when biking for transportation. I’ve found that if you prepare, it’s no big deal. People in countries all over the world bike in rain and snow. The only case I would avoid biking my regular route is when there is extreme heat. Just check the weather before you head out, prepare, time for the drier times, and you’ll be fine.</p>

<p>If you do have to bike when it is raining or snowing, you can wear a regular jacket. There are also rain ponchos designed specifically for cycling. You can also wear rain pants, but I find them a bit inconvenient.</p>

<p>Water proof shoes are pretty useful for cycling in weather, and just in daily life. I wear Vessi sneakers, but I’m sure there are plenty of good waterproof shoe varieties out there.</p>

<p>Mud guards are essential for cycling in any kind of wet weather. It prevents water from the road splashing you, and getting a stripe of mud down your back. Most good <a href="#the-ideal-bike">utility bicycles</a> have mud guards pre-installed. If your bike doesn’t have mud guards, they are pretty simple to install. Make sure to cycle at lower speeds so that less water gets picked up by your tires. Also lower speeds make it easier to stop and harder to slide out on slick ground.</p>

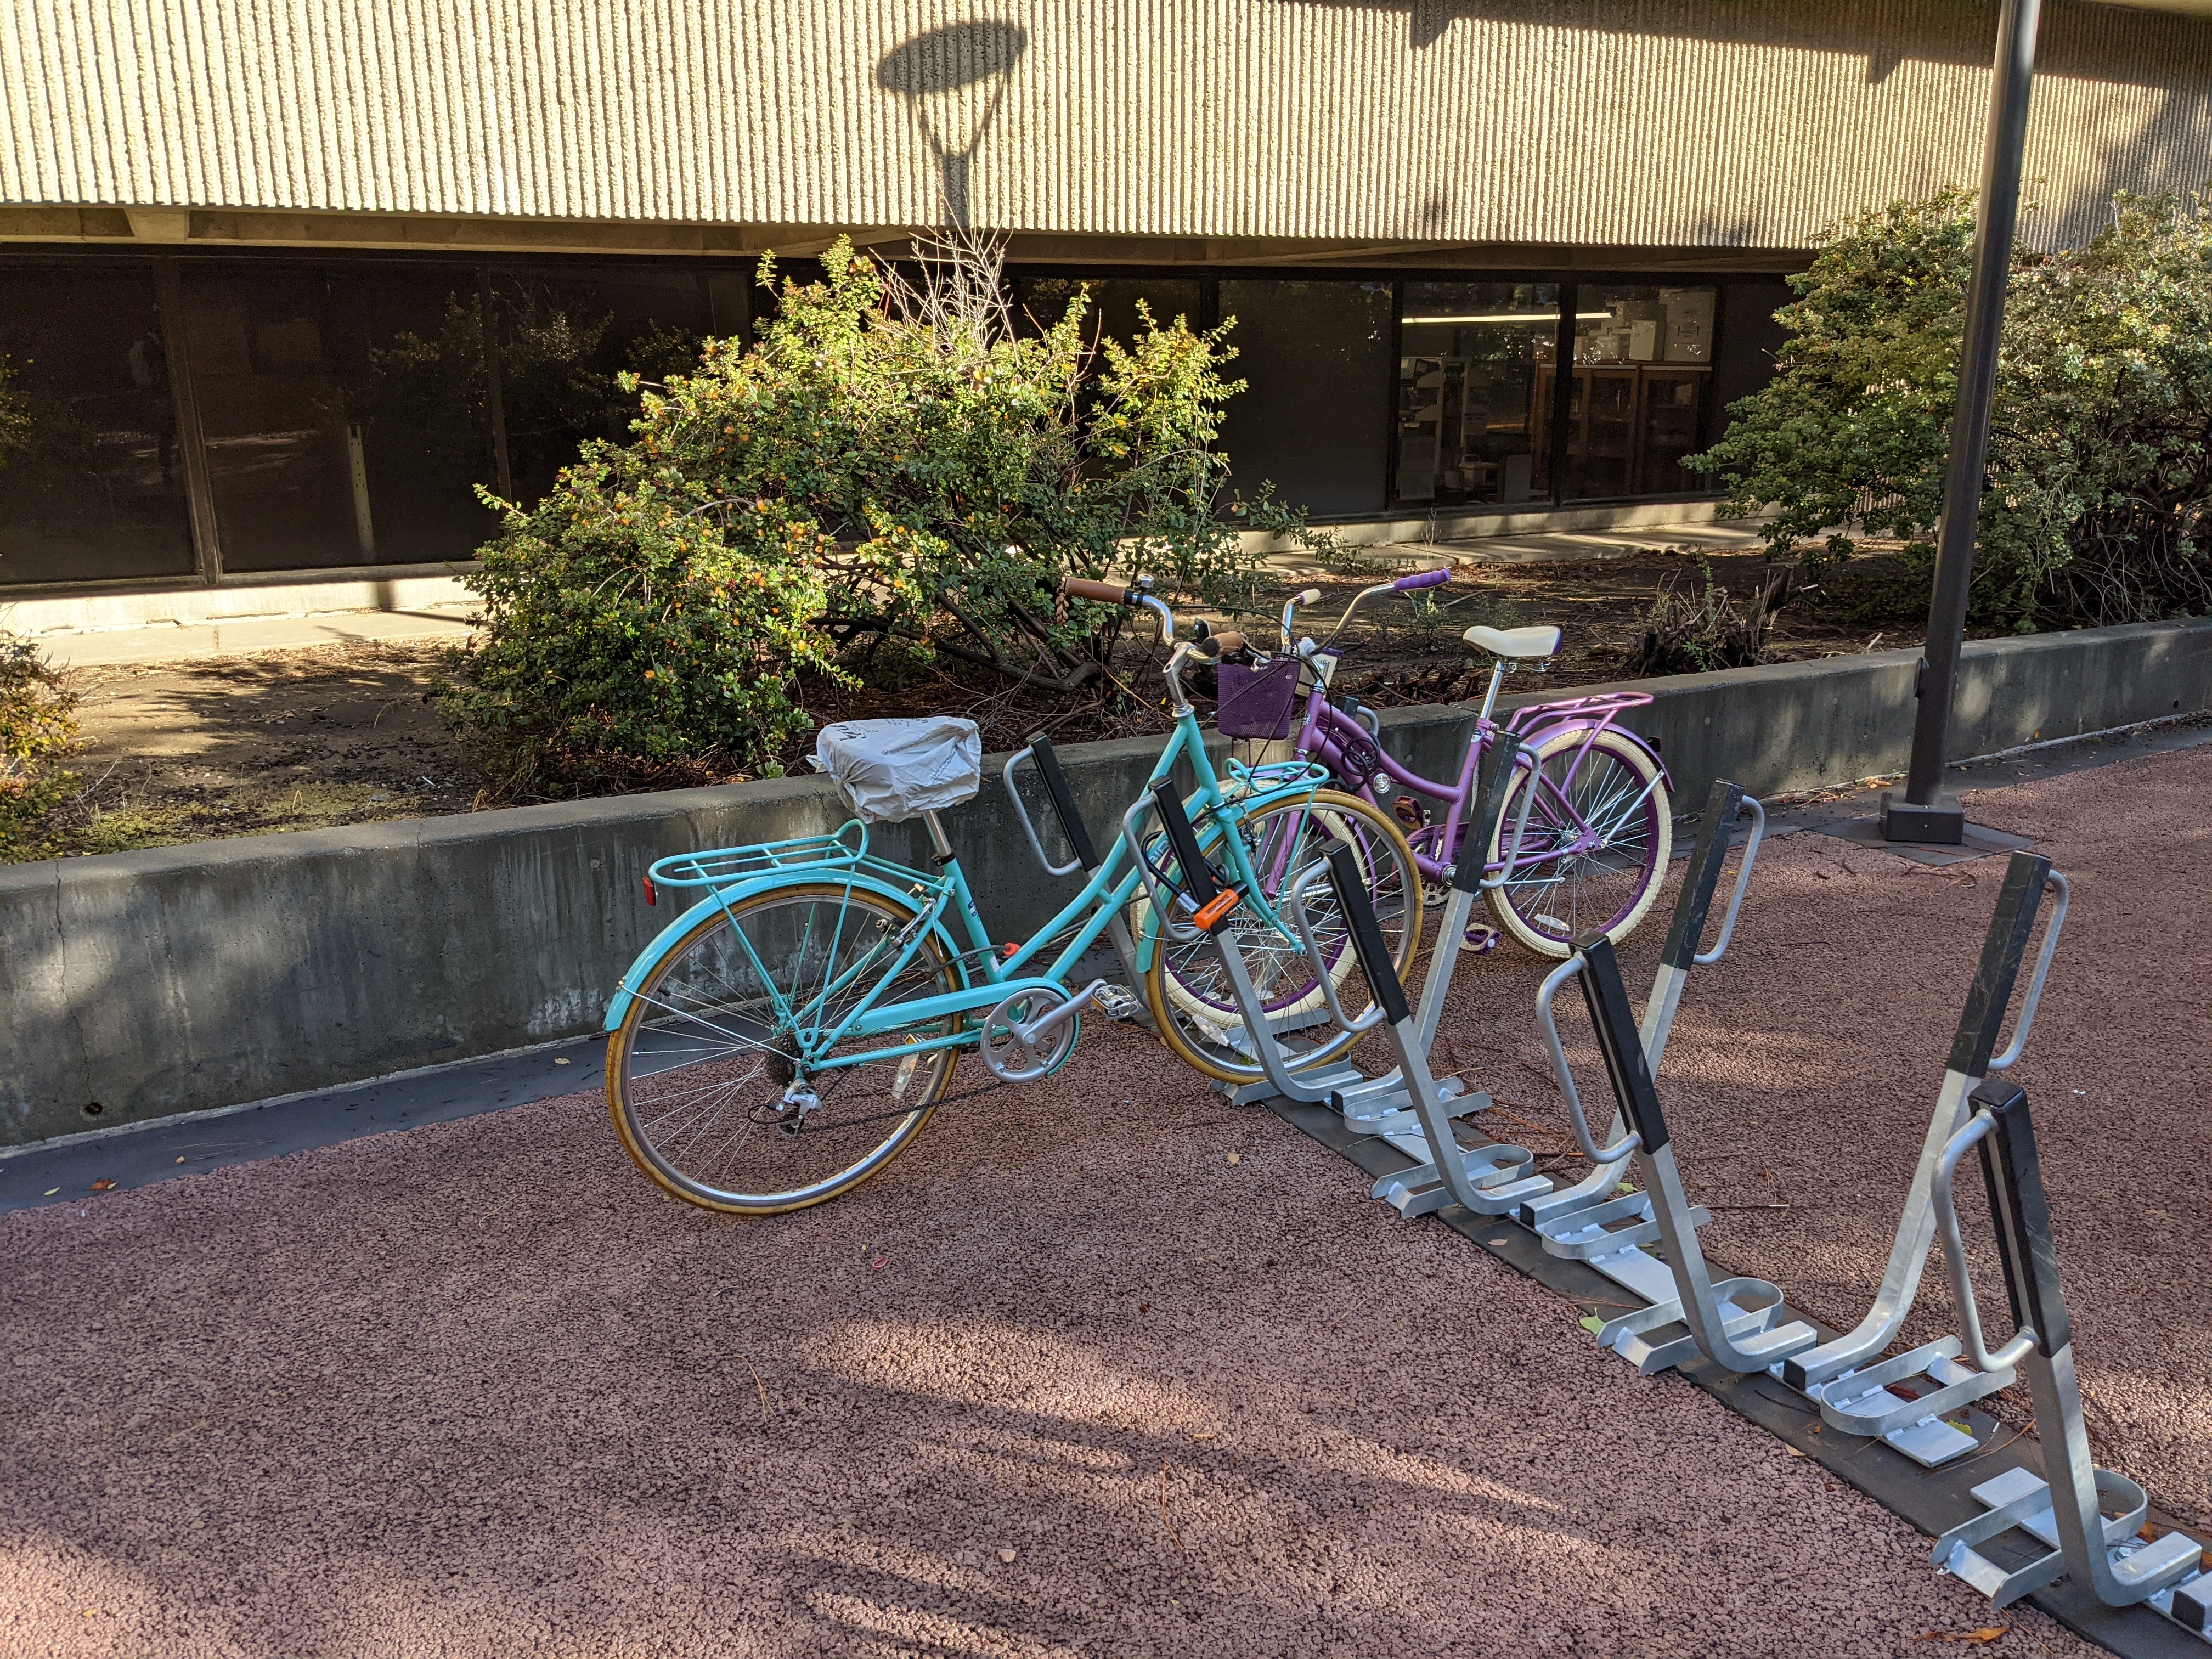
<p>If you are planning on parking your bike outside and you know it is going to rain, you can cover your seat in a plastic bag while parked. Then, you can take it off before you ride and it will be dry.</p>

<p><img src="/public/img/2026/01/14/covered-bike-seat.jpg" alt="A teal bike with parked at a lightning-bolt style bike rack, with a plastic bag covering the seat." /></p>

<h3 id="preparing-for-the-dark">Preparing for the Dark</h3>
<p>I try to avoid biking at night, but when I do I make sure to have both front and back lights. Legally in California, you only need a front light and a back reflector at night, but exceeding that requirement is much safer. I have some USB-C rechargeable bike lights that are bright and convenient. I also carry some smaller backup lights in my bag, just in case.</p>

<p>The traditional bike lights give good front and back visibility, but doesn’t give very good side visibility. There are some products that you can install on your spokes or pedals that help bridge this gap. Somehow random bike light products seem to be a popular category on Kickstarter.</p>

<h3 id="helmets">Helmets</h3>
<p>Wearing a helmet is a bit of a <a href="https://doi.org/10.1016/j.jth.2023.101709">controversial topic</a> in the cycling community. In California they are generally not required for adults. There are some good arguments to why they should not be mandated, and in many cycling friendly countries it’s less common to see people wear helmets. However, the United States is not a cycling friendly country, and I tend to avoid risk, so I choose to wear one.</p>

<p>Mips is an element of helmet design that is becoming more common. Not every impact is head on, so a Mips helmet helps reduce the risk of concussion from rotational force. It’s denoted by a yellow circle on the helmet labeled “Mips”.</p>

<p>Not all helmets protect equally. Virginia Tech has a helmet testing lab and <a href="https://www.helmet.beam.vt.edu/bicycle-helmet-ratings.html">publishes their safety ratings</a>. I try to stick to helmets with 5 stars. There are some listed at 5 stars for under $100.</p>

<p>Bike helmets are single use. If there is an impact on a helmet, it damages the foam and won’t be effective if there’s another crash. If there’s an impact on the helmet, it’s a good idea to throw it out and get a replacement.</p>

<h2 id="bike-security">Bike Security</h2>
<p>I’m passionate about cyber security, and this interest lends itself to bike security too. Over years of cycling for transportation, I’ve never had my bike stolen. The main philosophy for bike security is to be as secure as possible, so that a thief may find other bikes or things to steal more opportune.</p>

<h3 id="registration">Registration</h3>
<p>Registering a bike isn’t like a registering a car. It’s mostly an anti-theft tool. <a href="https://bikeindex.org/">Bike Index</a> is a non-profit that lets you register your bike for free. This registration provides legal proof that your bike is yours. Bike Index provides a systematic approach to preventing bike theft.</p>

<p>It’s important to report your bike stolen when if is stolen, even if you have no hope of getting it back. If you report a bike stolen to your local bike department, and then mark it stolen on Bike Index, police departments and bike shops now check if the bike is stolen. Often times police and bike shops know that a bike is stolen, but can’t do anything about it because they can’t prove it is stolen. If it’s reported, there’s a chance you can get it back. If everyone registers their bikes and marks it as stolen, then it disincentives bike theft as a whole.</p>

<p>It’s pretty easy and free to register your bike on <a href="https://bikeindex.org/">Bike Index</a>. Adding your serial number to your registration is an important part. Most bikes have their serial numbers on the bottom bracket, where the pedals attach. It’s easiest to turn your bike upside down and then record the number into Bike Index.</p>

<h3 id="choosing-a-lock">Choosing a Lock</h3>
<p>For most people, a u-lock is a good primarily lock. Additionally, as portable angle grinders are getting more powerful and cheap, try to get a lock resistant to them. Do not use a cable lock as your primarily lock, as it can be cut in no time with bolt cutters. The overall goal is to delay a thief as much as possible, so a they will select another target.</p>

<h3 id="parking-your-bike">Parking Your Bike</h3>
<p>Find a good location to lock your bike. A bike rack with lots of nearby foot traffic, or a secure parking area is ideal. I also bring my bike inside when I’m able, even if I have to carry it up some stairs. I try to avoid locking my bike to railways or sign posts, as they’re not designed to be that secure, and can block accessibility. The best bike racks in my opinion are <a href="https://commons.wikimedia.org/wiki/File:Davis_Bike_Rack.jpg">lightning bolt</a> style, and in my opinion cities should mandate this style.</p>

<p>Ensure your u-lock is locked through the frame and to the bike rack. It’s best to get as much things inside the lock as possible. This helps prevent prying the lock open. In some cases, you can try to include both the frame and a wheel. You can also use a cable lock for secondary protection for your wheels, but make sure your primarily lock is around the frame. Don’t lock just a wheel, as it is easy to remove the wheel and take the rest of the bike.</p>

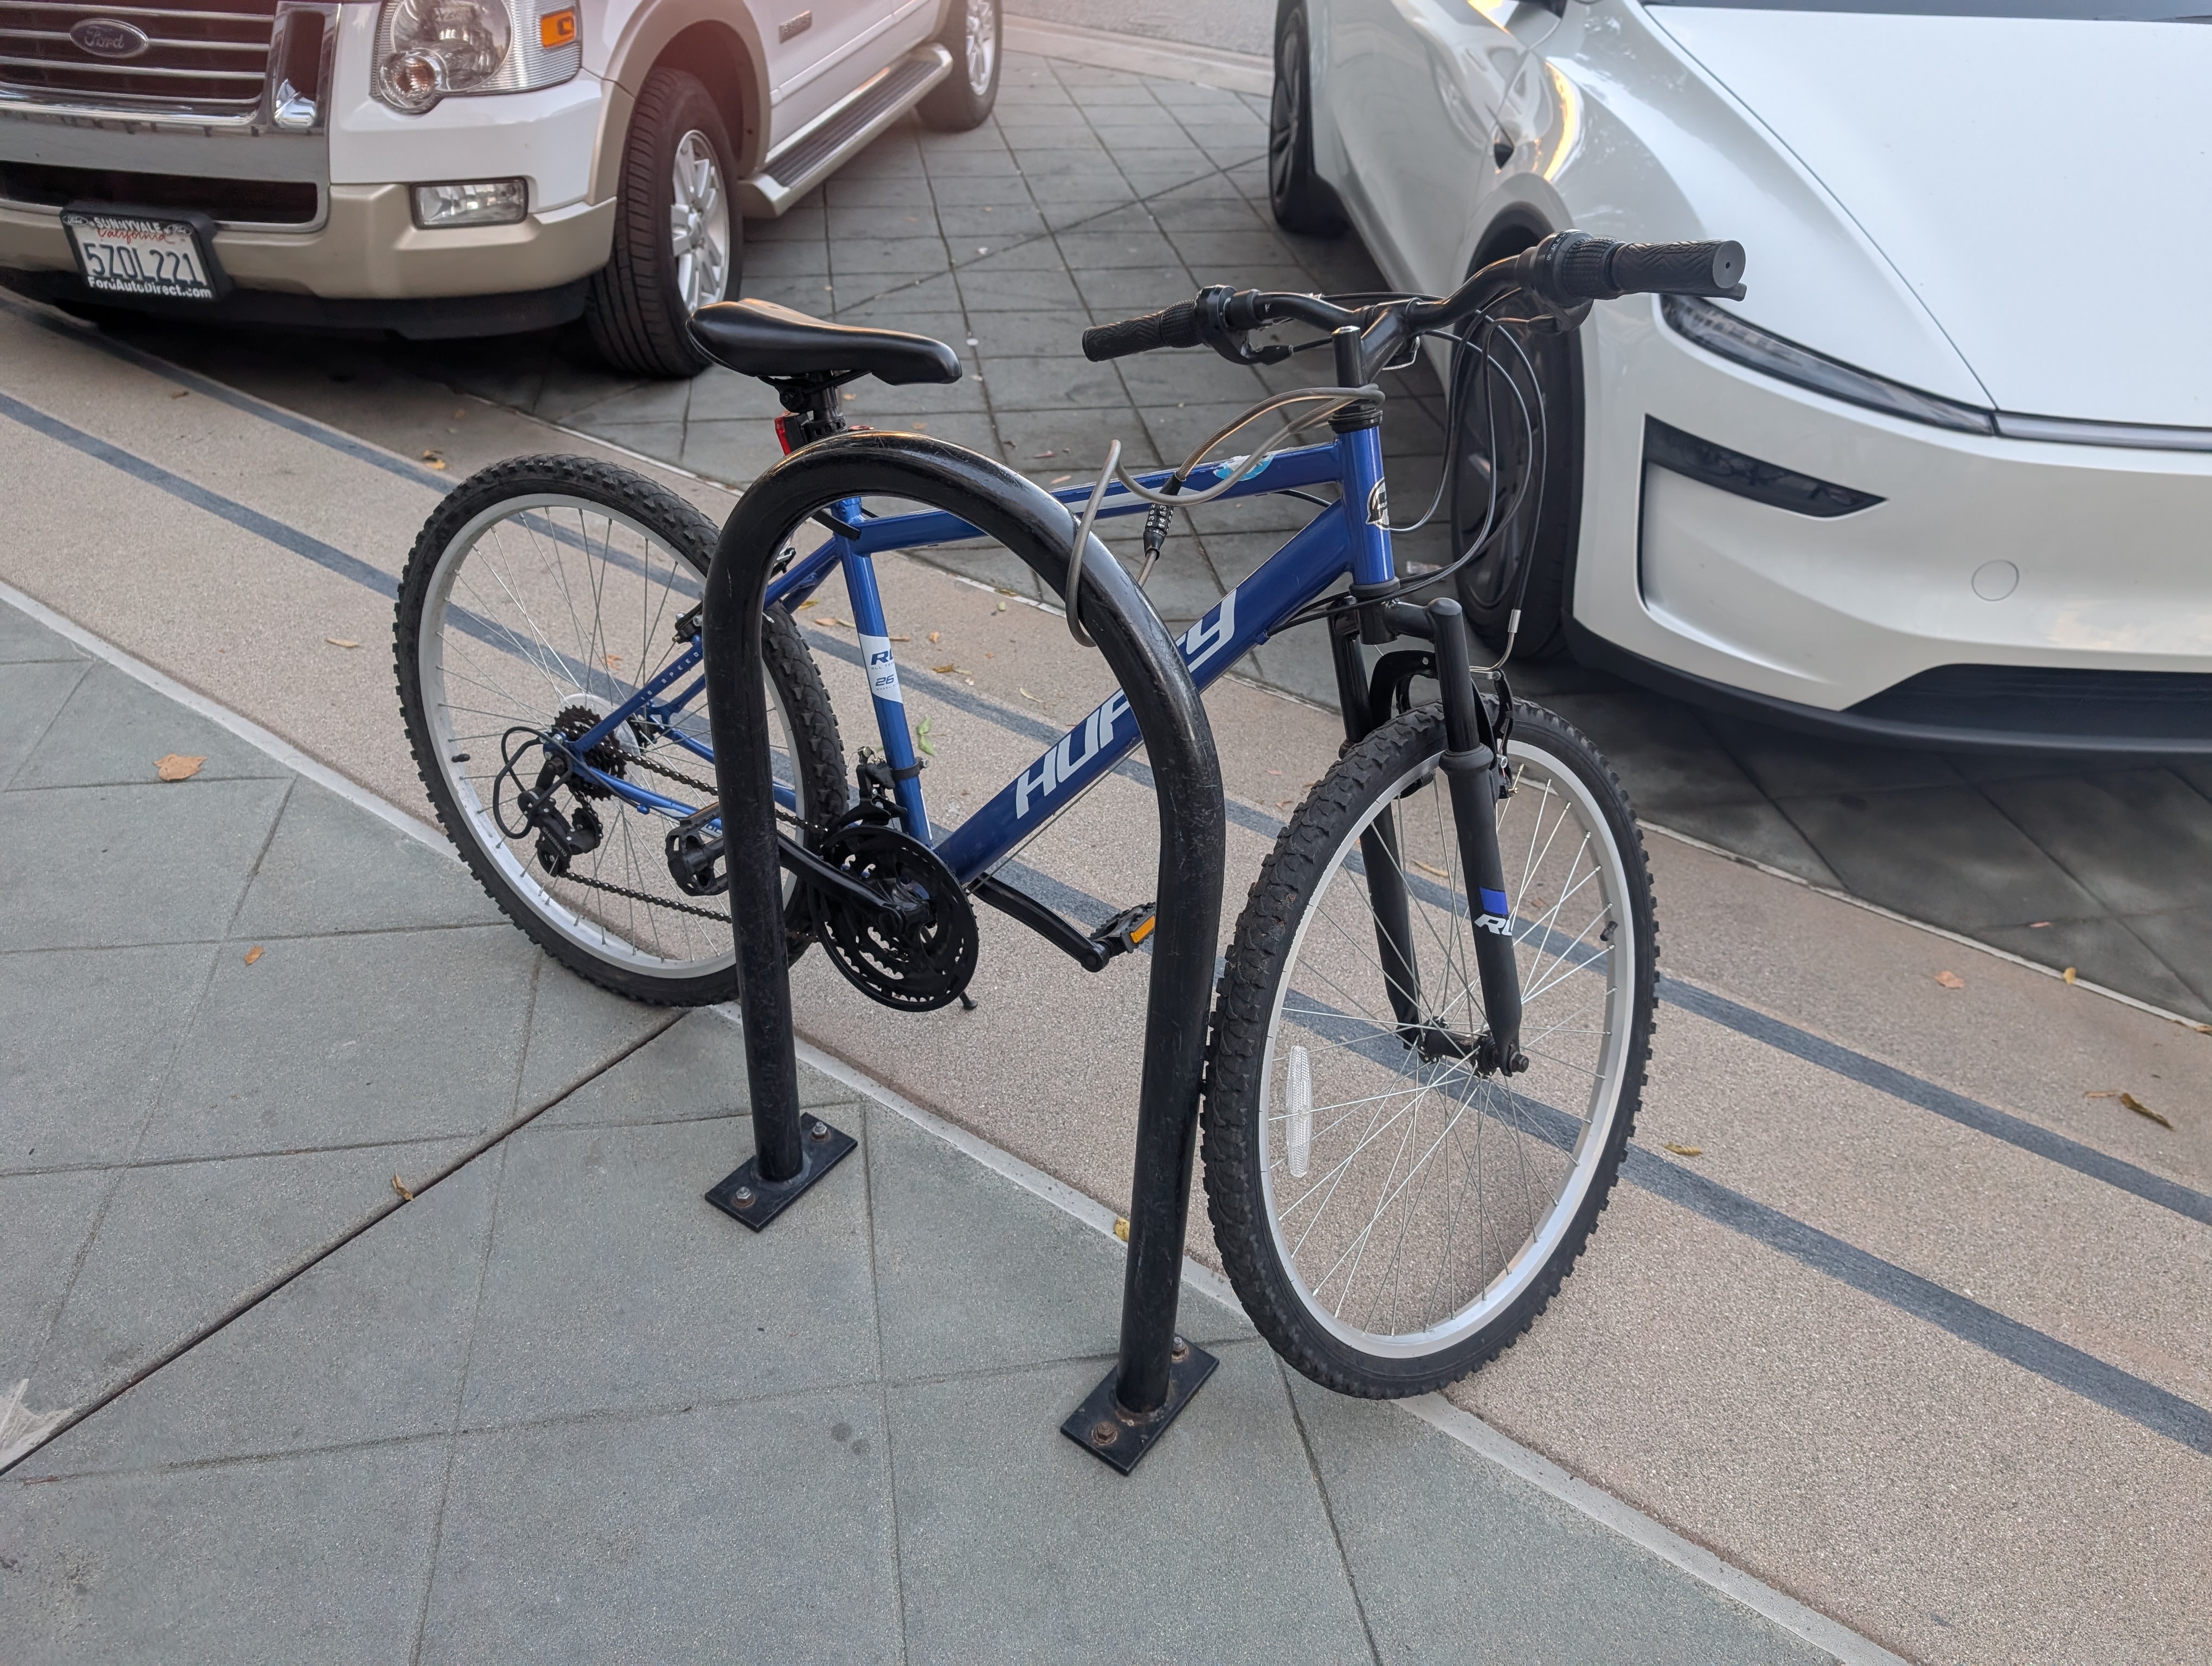
<p>Here you can see an example of a poorly locked bike I found in the wild (which I suspect was deliberately locked like this as a police bait bike). It uses a thin cable lock. It’s also not locked through the frame, and instead wrapped around the handlebars. A thief would be able to either quickly cut the cable lock, or unwrap the cable lock from around the handle bars.</p>

<p><img src="/public/img/2026/01/14/poorly-locked-bike.jpg" alt="A blue Huffy bike next to a U-shaped bike rack. There is a thin cable combination lock wrapped around the handlebar stem and the bike rack." /></p>

<h2 id="keeping-your-bike-in-good-condition">Keeping Your Bike In Good Condition</h2>

<h3 id="please-keep-your-tires-inflated">Please Keep Your Tires Inflated</h3>
<p>I see a lot of people ride around on low tires and spending a lot of extra energy. Resistance is a major concern when riding a bike, and lower tire pressures means adding rolling resistance. The correct tire pressure is usually written on the sidewall of the tire. I tend to top off my tires once a week, and I use a USB-C rechargeable bike pump.</p>

<h3 id="learn-basic-maintenance">Learn Basic Maintenance</h3>
<p>There is a wealth of knowledge on YouTube on how to repair bikes. Knowing some basic bike maintenance is convenient, keeps your bike in good condition longer, and saves some money. You can do most repairs with a basic multi-tool and tire levers.</p>

<p>You can find some community bike repair places that may be able to teach you how to repair bikes. For instance, Davis has the <a href="https://davisbikecollective.org/">Bike Collective</a>.</p>

<p>A flat tire is a common issue to fix. You can either replace it with a new tube, or ideally you can use a patch kit to fix the existing tube. If you don’t have a stand, you can just turn the bike upside down to take the wheels off.</p>

<p>Cleaning your bike and putting some oil on your chain once in a while is also good for long-term reliability.</p>

<p>Generally your bike shouldn’t be making much noise, except for the clicking from the free wheel mechanism. If your bike is making noise, something is probably wrong. If the brakes are rubbing, they should be adjusted. If your pedaling is making squeaking noises, try adding some oil to the chain.</p>

<h2 id="carrying-things">Carrying Things</h2>
<p>A backpack, if you already have one, is probably the simplest way to carry things around while you’re biking. However, there are more effective ways to carry things around. You can make your bike carry your things for you.</p>

<p>You can get a variety of bags that are purpose built for biking. One variety is the traditional pannier. These bags are designed to attach to a bike’s rack, and are great for carrying groceries. I also use a backpack from Two Wheel Gear that transforms into a pannier bag. Recently, I’ve been trying a messenger bag as well.</p>

<p>Bike racks can also carry things in other ways. I sometimes carry some bungee chords with me, which make it easy to attach things to the back rack. You can also attach a basket or a milk crate to a back rack.</p>

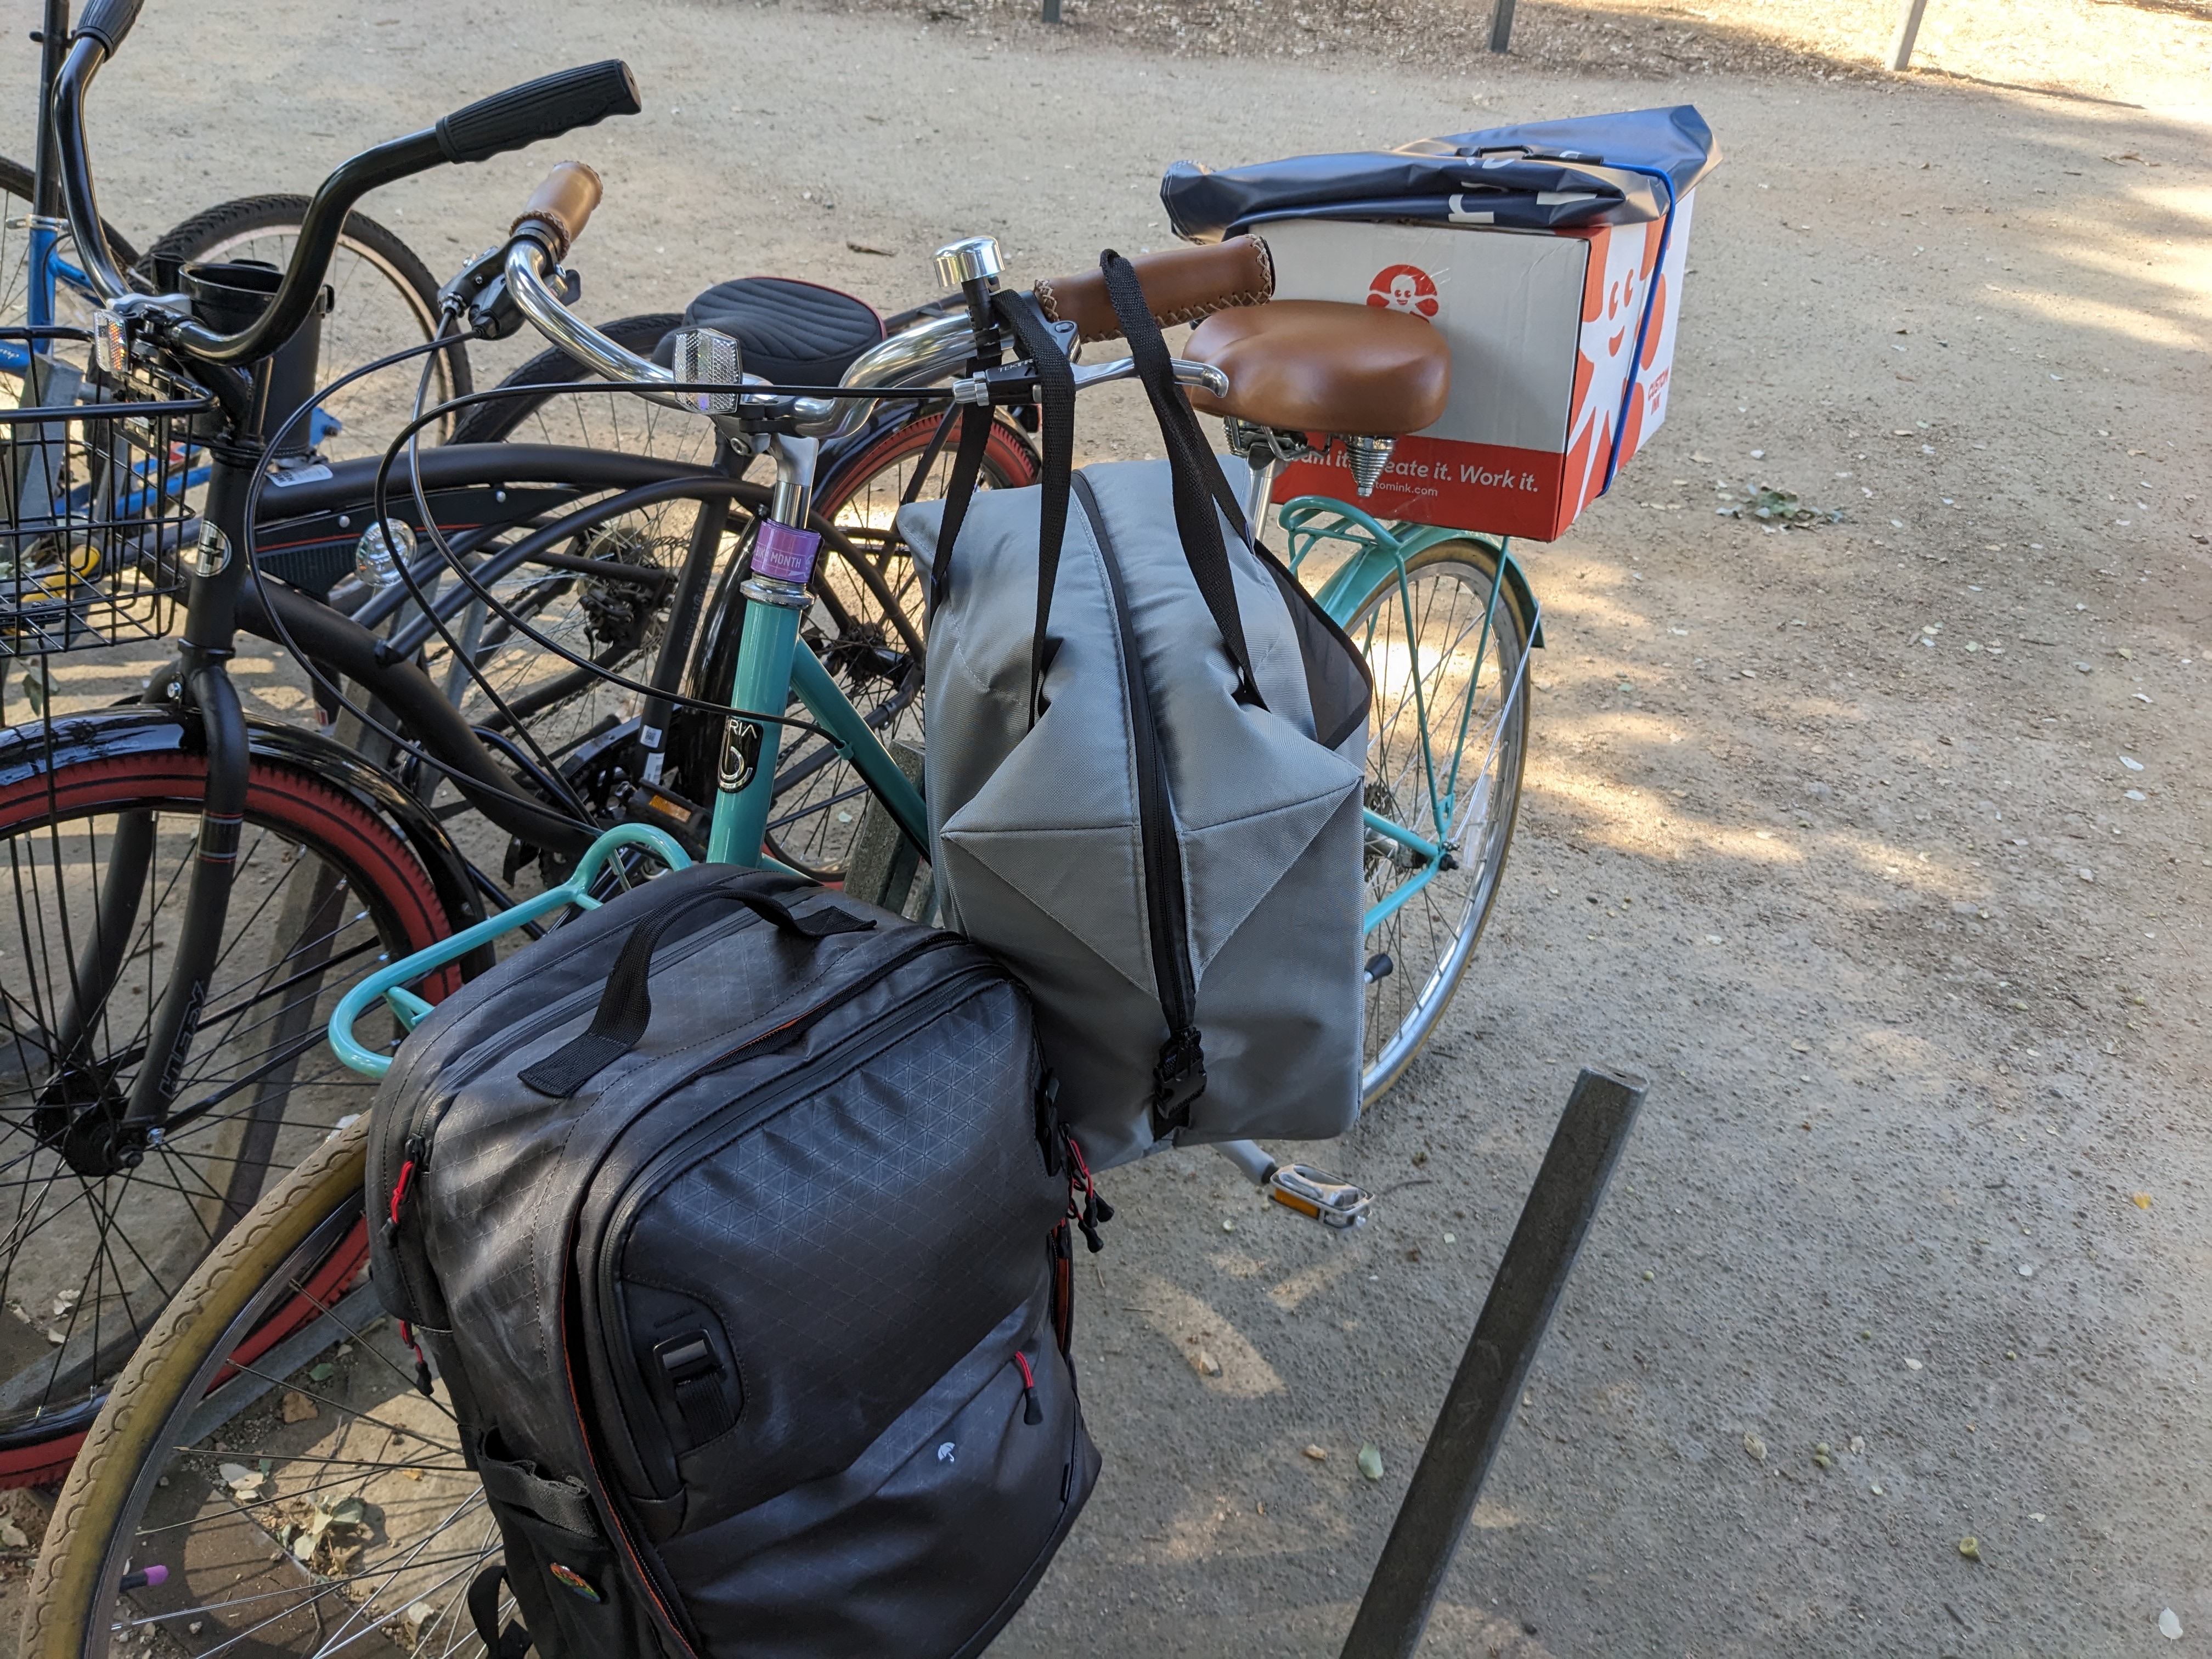
<p>A good <a href="#the-ideal-bike">city bike</a> has some mechanism to carry your things. You can put things in in a front basket, but if you want to carry more you can utilize a back rack. Here you can see the most things I’ve ever carried on my bike at once. I had my pannier-backpack attached to the front rack, a freezer back around the handle bars, and a box attached to the back with bungee chords.</p>

<p><img src="/public/img/2026/01/14/bike-carrying-many-things.jpg" alt="A teal bike carrying many things." /></p>

<h2 id="cycling-plus-transit-is-a-powerful-combo">Cycling Plus Transit Is a Powerful Combo</h2>
<p>Taking your bike on public transit can significantly extend your range. Trains are the best, because they let bikes inside. Some busses have racks on the front that can be loaded before boarding. Just make sure to inform the driver that you’re going to take the bike off the rack when you get off. Different transit agencies have different rules, so be sure to check before making your trip. For instance, in Davis, there are two main transit agencies. Unitrans prohibits bikes on board, while YoloBus has bike front racks.</p>

<p>The <a href="https://transitapp.com/">Transit App</a> has good bike instructions. They have a feature called Transit+, where it shows instructions for combined biking and transit trips.</p>

<h2 id="collisions">Collisions</h2>
<p>I’ve been fortunate to have a bike collision (don’t call them <a href="https://newrepublic.com/article/166004/invention-accidents-car-crash-deaths-jessie-singer-book-review">accidents</a> because they are preventable). A <a href="https://web.archive.org/web/20250320173505/https://ehp.niehs.nih.gov/doi/10.1289/ehp.0901747">broader look</a> has found that the health benefits outweigh the risks. However, in the United States, poor bike infrastructure has made collisions more likely. Knowing what to do in a collision with a car is <a href="https://www.youtube.com/watch?v=c6V88KIIe20">important</a>. The main thing is to make sure to have documentation. A police report may be warranted. Make sure to get contact info of witnesses. Take as many photos, from different angles and perspectives. Visit an urgent care and make sure you’re okay. Also make sure to replace your <a href="#helmets">helmet</a>, as they are only effective for one crash.</p>

<h2 id="conclusion">Conclusion</h2>

<p>Thank you for taking time to read my guide on cycling for transportation. It’s a topic I’m very passionate about. I hope that this guide helps make biking to work or school easier for you.</p>

<p>If you want to hear more from me, you can keep an eye on my <a href="/posts">site</a> or subscribe to my <a href="/feed.xml">feed</a>.</p>]]></content><author><name>Ashley Bilbrey</name></author><summary type="html"><![CDATA[Everything I have learned from my experience cycling to school and work.]]></summary></entry><entry><title type="html">How to Link Discord and Slack Channels</title><link href="https://www.ashleybilbrey.com/posts/2025/07/08/how-to-link-discord-and-slack/" rel="alternate" type="text/html" title="How to Link Discord and Slack Channels" /><published>2025-07-08T00:00:00+00:00</published><updated>2025-07-08T00:00:00+00:00</updated><id>https://www.ashleybilbrey.com/posts/2025/07/08/how-to-link-discord-and-slack</id><content type="html" xml:base="https://www.ashleybilbrey.com/posts/2025/07/08/how-to-link-discord-and-slack/"><![CDATA[<p>My local hacker space has both a Slack workspace and a Discord server. Recently 
the group has been trying to decide if we should stick to one platform. Keeping
multiple platforms requires keeping an eye on multiple apps, duplicating
announcements, and more. At the core, Slack and Discord are essentially ✨ fancy ✨
versions of old school <a href="https://en.wikipedia.org/wiki/IRC">IRC channels</a>. Why 
not let people choose one platform that they prefer, while relaying messages
between the two?</p>

<p>This guide will go step-by-step on how to use <a href="https://github.com/42wim/matterbridge/">matterbridge</a>,
a software designed to connect chat services together, to link Slack and Discord
channels.</p>

<p><strong>Note:</strong> This guide temporarily has an extra step due to Slack <a href="https://api.slack.com/changelog/2024-04-discontinuing-new-creation-of-classic-slack-apps-and-custom-bots">discontinuing “legacy” apps</a>.
This guide will be updated when matterbridge is fully updated to support “modern”
Slack apps.</p>

<h2 id="what-youll-need">What You’ll Need</h2>
<ol>
  <li><a href="https://support.discord.com/hc/en-us/articles/204849977-How-do-I-create-a-server">A Discord server</a>.</li>
  <li><a href="https://slack.com/help/articles/206845317-Create-a-Slack-workspace">A Slack workspace</a>.</li>
  <li>A server or computer that you can keep running and connected to the internet, preferably running on renewable electricity.</li>
  <li><a href="https://docs.docker.com/engine/install/">Docker Engine</a> installed on the server or <a href="https://docs.docker.com/desktop/">Docker Desktop</a> on the computer.</li>
  <li><a href="https://git-scm.com/downloads">Git</a> installed on that server or computer.</li>
</ol>

<h2 id="slack-setup">Slack Setup</h2>
<p>First to create a Slack app and make sure it has the proper permissions.</p>

<p>Make sure you are logged into your Slack Workspace, then head to the <a href="https://api.slack.com/apps">Slack API Apps</a>
page.</p>

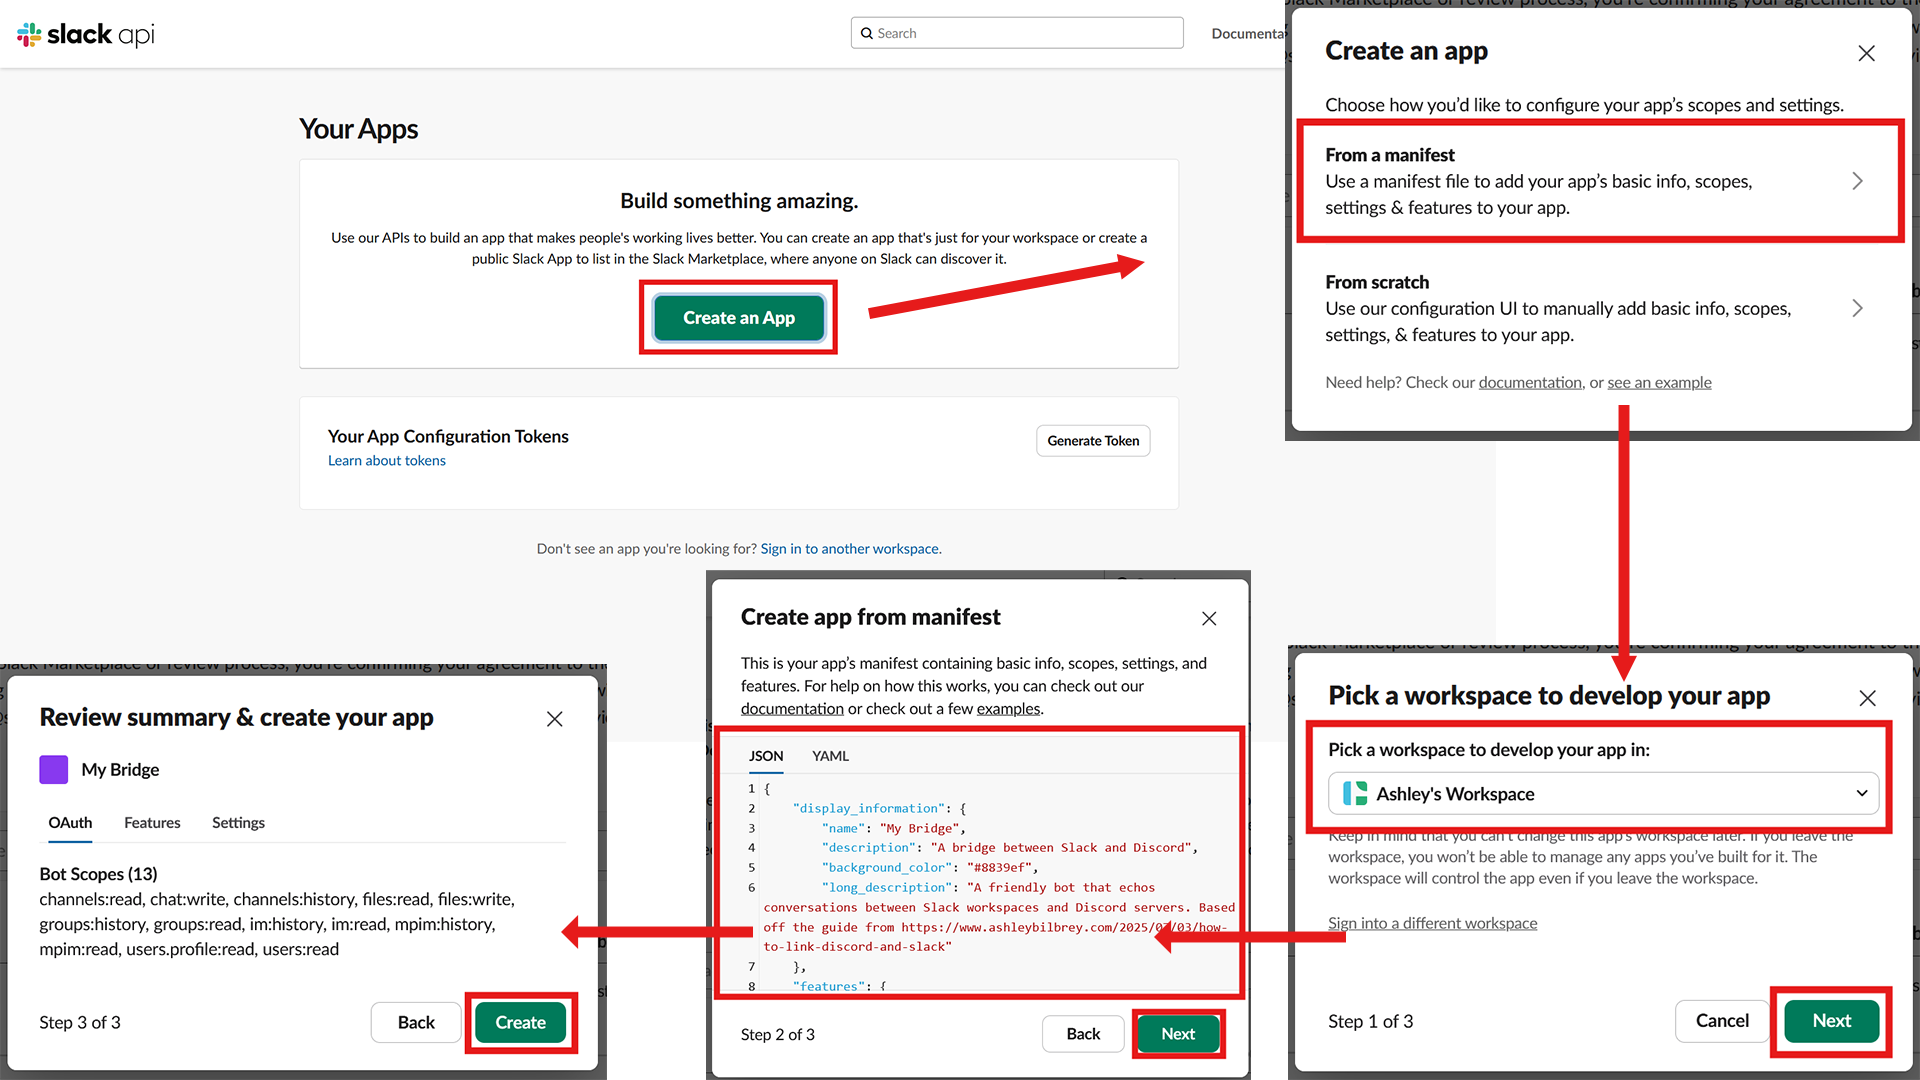
<p>Click the “Create an App” button, select “From manifest”. Select the Slack workspace
that you want to bridge. Then, copy and paste this configuration. This configuration
file loads all the permissions that the bot needs in your workspace.</p>

<p><img src="/public/img/2025/07/08/slack-create-app.png" alt="Slack API App UI,  with a red box highlighting a 'Create An App' button. An arrow points to a modal labeled 'Create An App', with a red box around the 'From a manifest' option. A  red arrow points from there to another modal labeled 'Pick a workspace to  develop your app', with a red box around a dropdown menu where 'Ashley's  Workspace' is selected in a dropdown menu. There is also a red box around the 'Next' button. From there a red arrow points to another modal labeled 'Create app from manifest'. There is a red box surrounding a text box with config code inside, and another red box surrounding a 'Next' button. An arrow leads from there pointing another modal labeled 'Review summary &amp; create your app', with a red box around the 'Create' button." /></p>

<div class="language-json highlighter-rouge"><div class="highlight"><pre class="highlight"><code><span class="p">{</span><span class="w">
    </span><span class="nl">"display_information"</span><span class="p">:</span><span class="w"> </span><span class="p">{</span><span class="w">
        </span><span class="nl">"name"</span><span class="p">:</span><span class="w"> </span><span class="s2">"My Bridge"</span><span class="p">,</span><span class="w">
        </span><span class="nl">"description"</span><span class="p">:</span><span class="w"> </span><span class="s2">"A bridge between Slack and Discord"</span><span class="p">,</span><span class="w">
        </span><span class="nl">"background_color"</span><span class="p">:</span><span class="w"> </span><span class="s2">"#8839ef"</span><span class="p">,</span><span class="w">
        </span><span class="nl">"long_description"</span><span class="p">:</span><span class="w"> </span><span class="s2">"A friendly bot that echos conversations between Slack workspaces and Discord servers. Based off the guide from https://www.ashleybilbrey.com/posts/2025/07/03/how-to-link-discord-and-slack"</span><span class="w">
    </span><span class="p">},</span><span class="w">
    </span><span class="nl">"features"</span><span class="p">:</span><span class="w"> </span><span class="p">{</span><span class="w">
        </span><span class="nl">"bot_user"</span><span class="p">:</span><span class="w"> </span><span class="p">{</span><span class="w">
            </span><span class="nl">"display_name"</span><span class="p">:</span><span class="w"> </span><span class="s2">"My Bridge"</span><span class="p">,</span><span class="w">
            </span><span class="nl">"always_online"</span><span class="p">:</span><span class="w"> </span><span class="kc">false</span><span class="w">
        </span><span class="p">}</span><span class="w">
    </span><span class="p">},</span><span class="w">
    </span><span class="nl">"oauth_config"</span><span class="p">:</span><span class="w"> </span><span class="p">{</span><span class="w">
        </span><span class="nl">"scopes"</span><span class="p">:</span><span class="w"> </span><span class="p">{</span><span class="w">
            </span><span class="nl">"bot"</span><span class="p">:</span><span class="w"> </span><span class="p">[</span><span class="w">
                </span><span class="s2">"channels:read"</span><span class="p">,</span><span class="w">
                </span><span class="s2">"chat:write"</span><span class="p">,</span><span class="w">
                </span><span class="s2">"channels:history"</span><span class="p">,</span><span class="w">
                </span><span class="s2">"files:read"</span><span class="p">,</span><span class="w">
                </span><span class="s2">"files:write"</span><span class="p">,</span><span class="w">
                </span><span class="s2">"groups:history"</span><span class="p">,</span><span class="w">
                </span><span class="s2">"groups:read"</span><span class="p">,</span><span class="w">
                </span><span class="s2">"im:history"</span><span class="p">,</span><span class="w">
                </span><span class="s2">"im:read"</span><span class="p">,</span><span class="w">
                </span><span class="s2">"mpim:history"</span><span class="p">,</span><span class="w">
                </span><span class="s2">"mpim:read"</span><span class="p">,</span><span class="w">
                </span><span class="s2">"users.profile:read"</span><span class="p">,</span><span class="w">
                </span><span class="s2">"users:read"</span><span class="w">
            </span><span class="p">]</span><span class="w">
        </span><span class="p">}</span><span class="w">
    </span><span class="p">},</span><span class="w">
    </span><span class="nl">"settings"</span><span class="p">:</span><span class="w"> </span><span class="p">{</span><span class="w">
        </span><span class="nl">"event_subscriptions"</span><span class="p">:</span><span class="w"> </span><span class="p">{</span><span class="w">
            </span><span class="nl">"bot_events"</span><span class="p">:</span><span class="w"> </span><span class="p">[</span><span class="w">
                </span><span class="s2">"channel_history_changed"</span><span class="p">,</span><span class="w">
                </span><span class="s2">"group_history_changed"</span><span class="p">,</span><span class="w">
                </span><span class="s2">"im_history_changed"</span><span class="p">,</span><span class="w">
                </span><span class="s2">"message.channels"</span><span class="p">,</span><span class="w">
                </span><span class="s2">"message.groups"</span><span class="p">,</span><span class="w">
                </span><span class="s2">"message.im"</span><span class="p">,</span><span class="w">
                </span><span class="s2">"message.mpim"</span><span class="w">
            </span><span class="p">]</span><span class="w">
        </span><span class="p">},</span><span class="w">
        </span><span class="nl">"interactivity"</span><span class="p">:</span><span class="w"> </span><span class="p">{</span><span class="w">
            </span><span class="nl">"is_enabled"</span><span class="p">:</span><span class="w"> </span><span class="kc">true</span><span class="w">
        </span><span class="p">},</span><span class="w">
        </span><span class="nl">"org_deploy_enabled"</span><span class="p">:</span><span class="w"> </span><span class="kc">false</span><span class="p">,</span><span class="w">
        </span><span class="nl">"socket_mode_enabled"</span><span class="p">:</span><span class="w"> </span><span class="kc">true</span><span class="p">,</span><span class="w">
        </span><span class="nl">"token_rotation_enabled"</span><span class="p">:</span><span class="w"> </span><span class="kc">false</span><span class="w">
    </span><span class="p">}</span><span class="w">
</span><span class="p">}</span><span class="w">

</span></code></pre></div></div>

<p>Once you’ve created the Slack application, you should end up on the “Basic
Information” page. Feel free to customize the appearance of the bot here, like name
and profile image.</p>

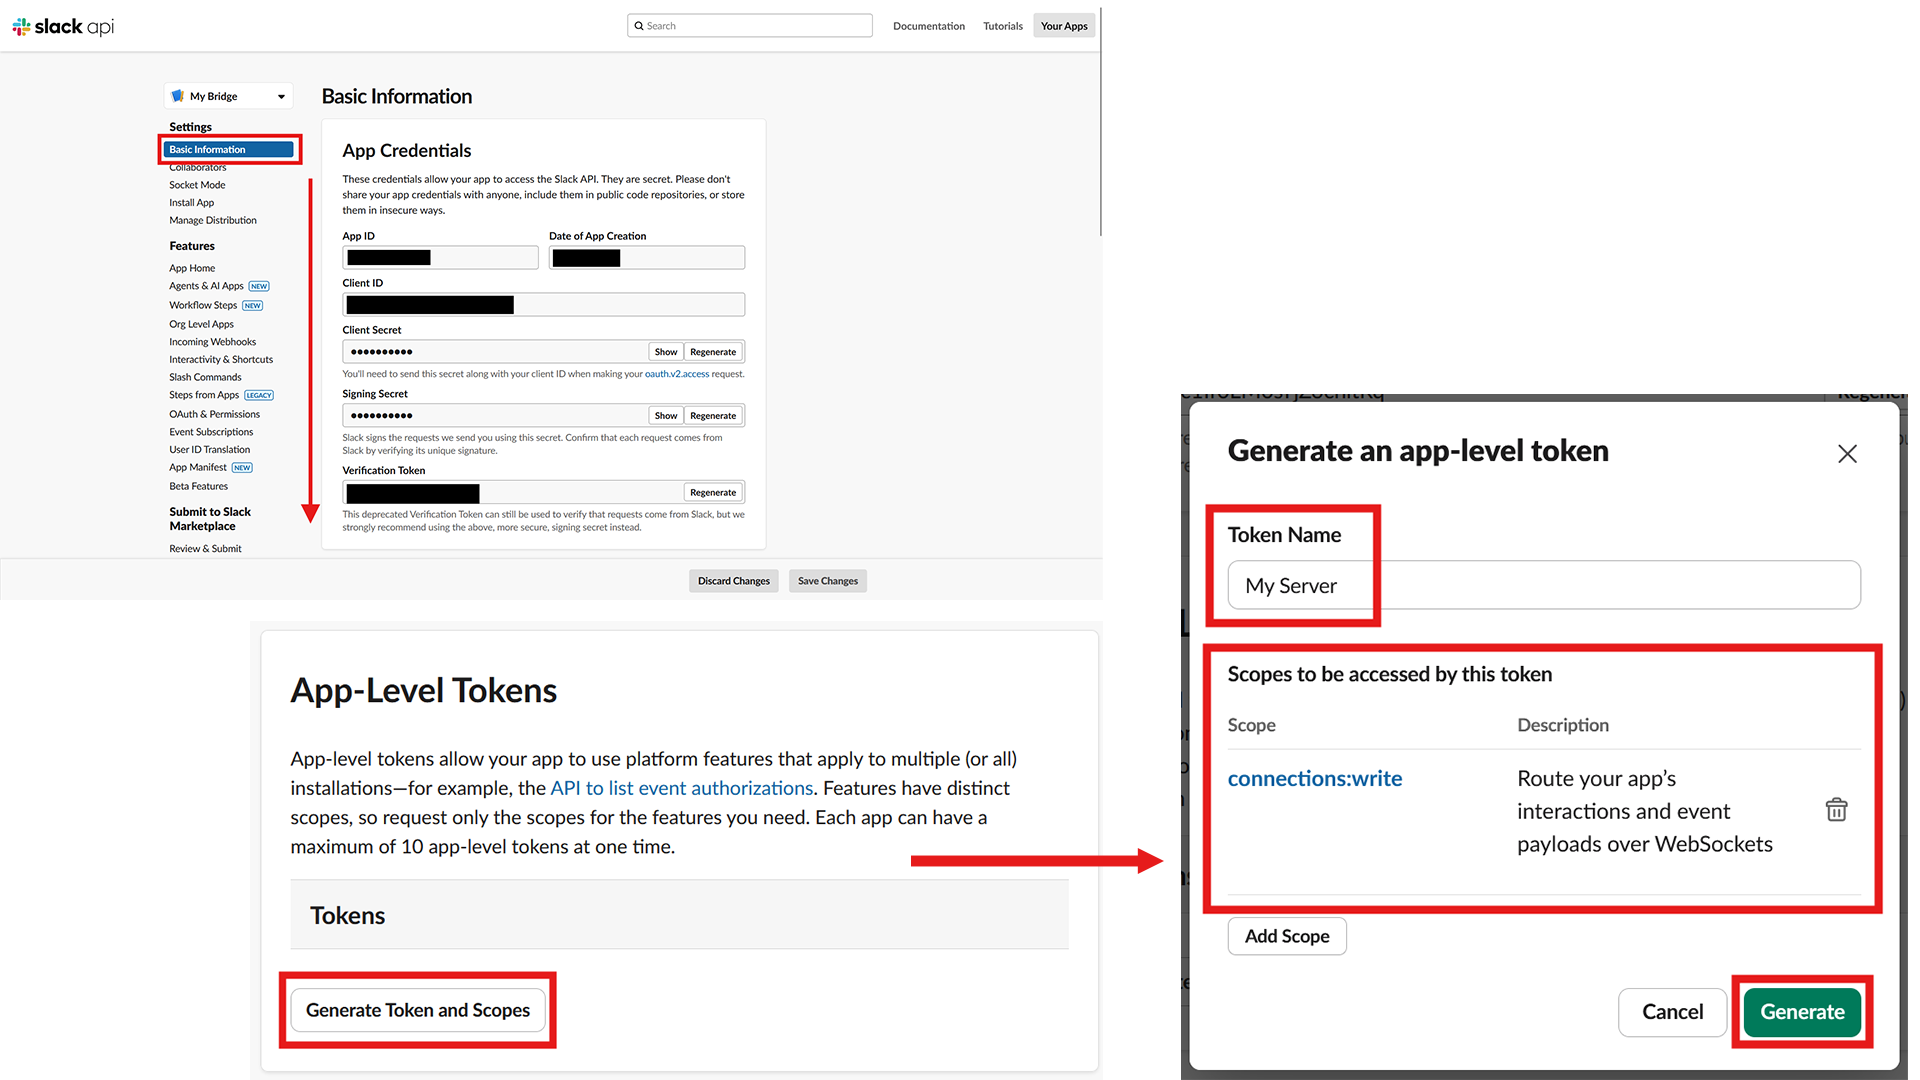
<p>You’ll need two tokens to use with matterbridge. From the “Basic Information” tab,
head to the “App-Level Tokens” section and click “Generate Token and Scopes”. Name
your token whatever you’d like, and give it the <code class="language-plaintext highlighter-rouge">connections:write</code> scope.
Copy and save the token you receive somewhere safe for later. It should start with
<code class="language-plaintext highlighter-rouge">xapp-</code>.</p>

<p><img src="/public/img/2025/07/08/slack-get-app-token.png" alt="The API Slack App UI for 'My Bridge', with a red box around the 'Basic Information' tab and an  arrow headed down the page. There is a section labeled 'App-Level Tokens' with a red box around a button inside labeled 'Generate Token and Scopes'. There is a red arrow pointing from there to a modal labeled 'Generate an app-level token'.  There is a red box surrounding a section labeled 'Token Name' with 'My Server' filled in. There is another section labeled 'Scopes to be accessed by this token' with a red box around it. The 'connections:write' scope is selected. There is  a red box around the 'Generate' button." /></p>

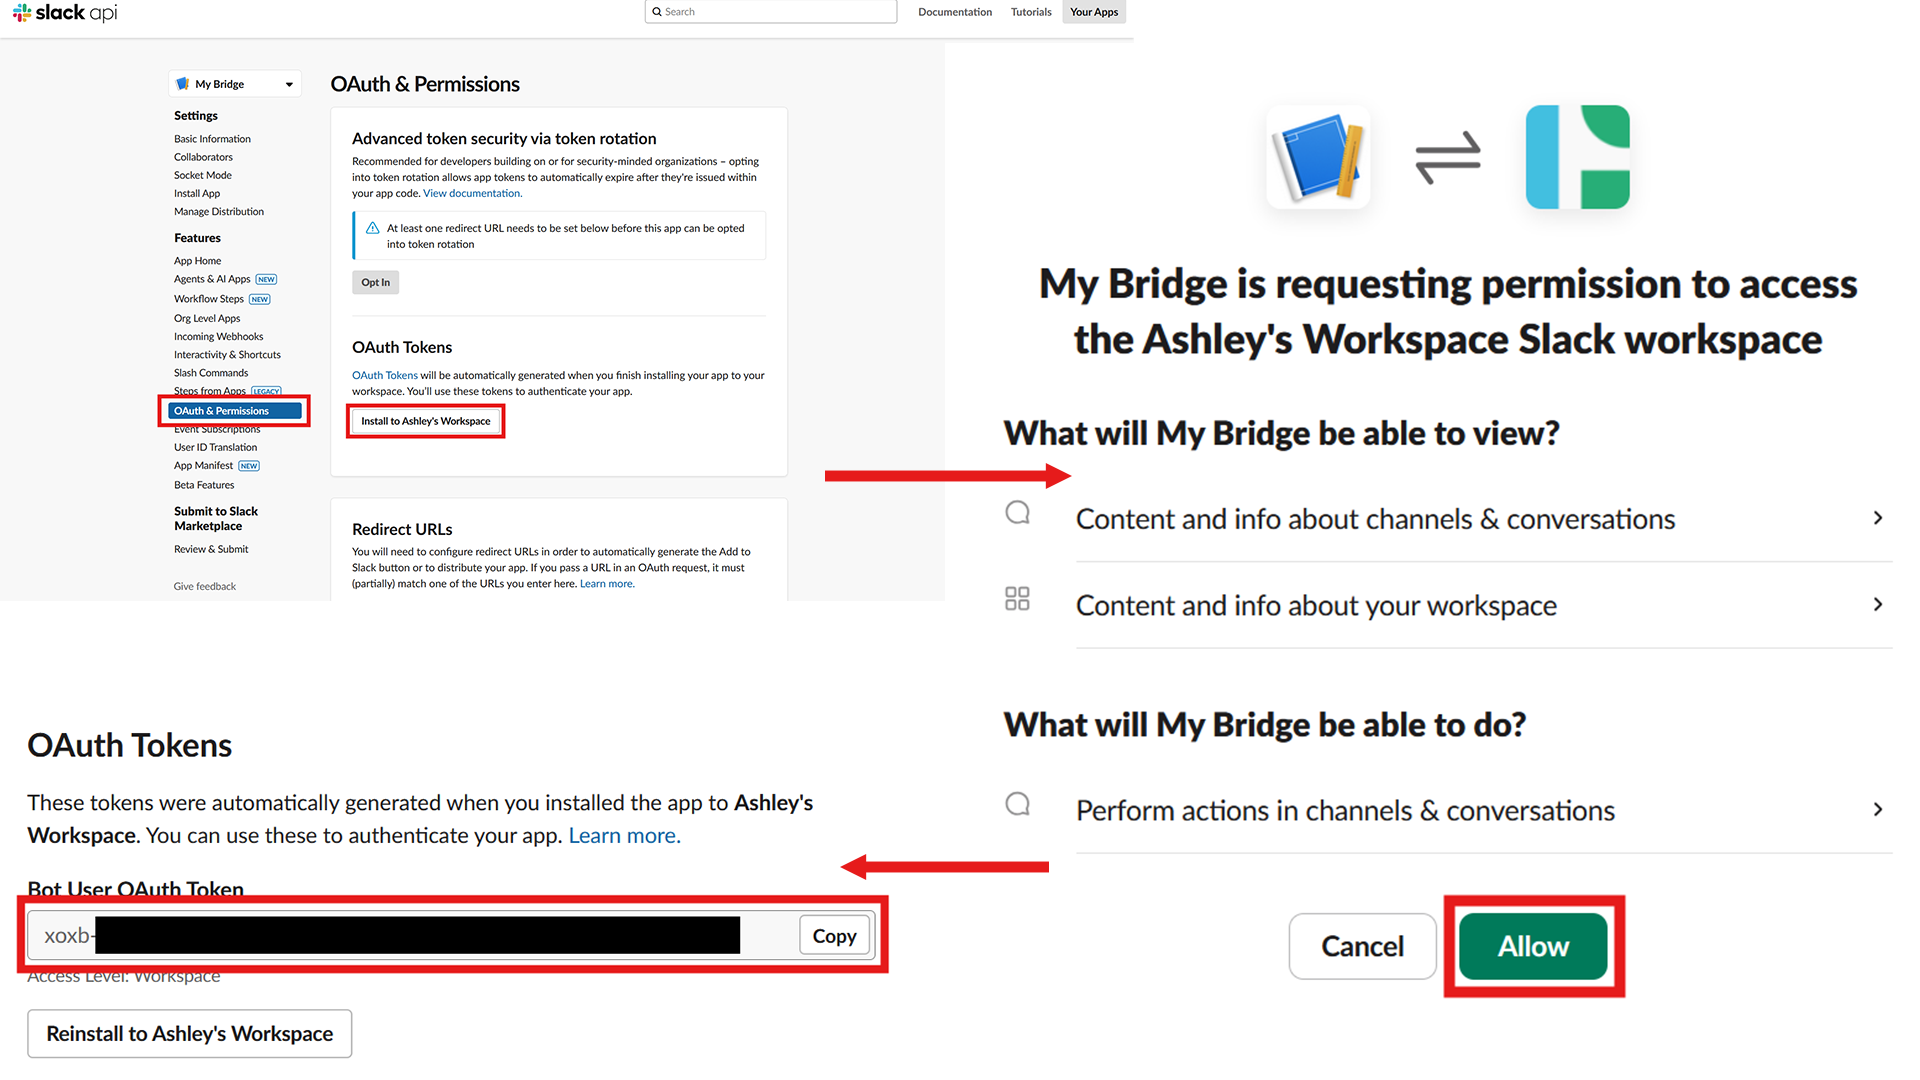
<p>The second token you can get from the “OAuth &amp; Permissions” tab. Install the app
using the button in the “OAuth Tokens” section. If you don’t have admin permissions,
you can send the request to install the app to your workspace admin. Otherwise,
approve the app.</p>

<p>After that, you can copy the “Bot User OAuth Token” and save it somewhere safe for
later. It should start with <code class="language-plaintext highlighter-rouge">xoxb-</code>.</p>

<p><img src="/public/img/2025/07/08/slack-install-app-and-oauth-token.png" alt="The API Slack App UI for 'My Bridge', with a red box around the 'OAuth &amp; Permissions tab. In the 'OAuth Tokens' section, a red box surrounds a button labeled 'Install to Ashley's Workspace'. An arrow leads from there to a modal labeled 'My Bridge is requesting permission to access the Ashley's Workspace Slack workspace'. An arrow leads from there back to the same 'OAuth Tokens' section, now with the install button replaced with a censored token, highlighted by a red box." /></p>

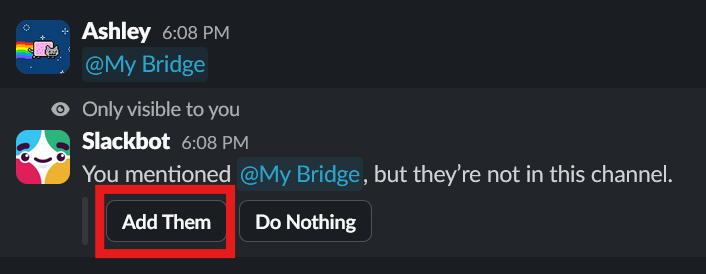
<p>Now your Slack application should be in your workspace, like any other application
or user. Make sure you invite the application to any channels you wish to bridge.
An easy way to do that is to @mention the application and it should provide you
with an option to add it to the channel.</p>

<p><img src="/public/img/2025/07/08/slack-add-app-to-channel.png" alt="A Slack channel with the user 'Ashley' sending a message mentioning '@My Bridge'. Then in reply the user 'Slackbot' saying 'You mentioned @My Bridge, but they're not in this channel.' There is a red box surrounding a button labeled 'Add Them'." /></p>

<h2 id="discord-setup">Discord Setup</h2>
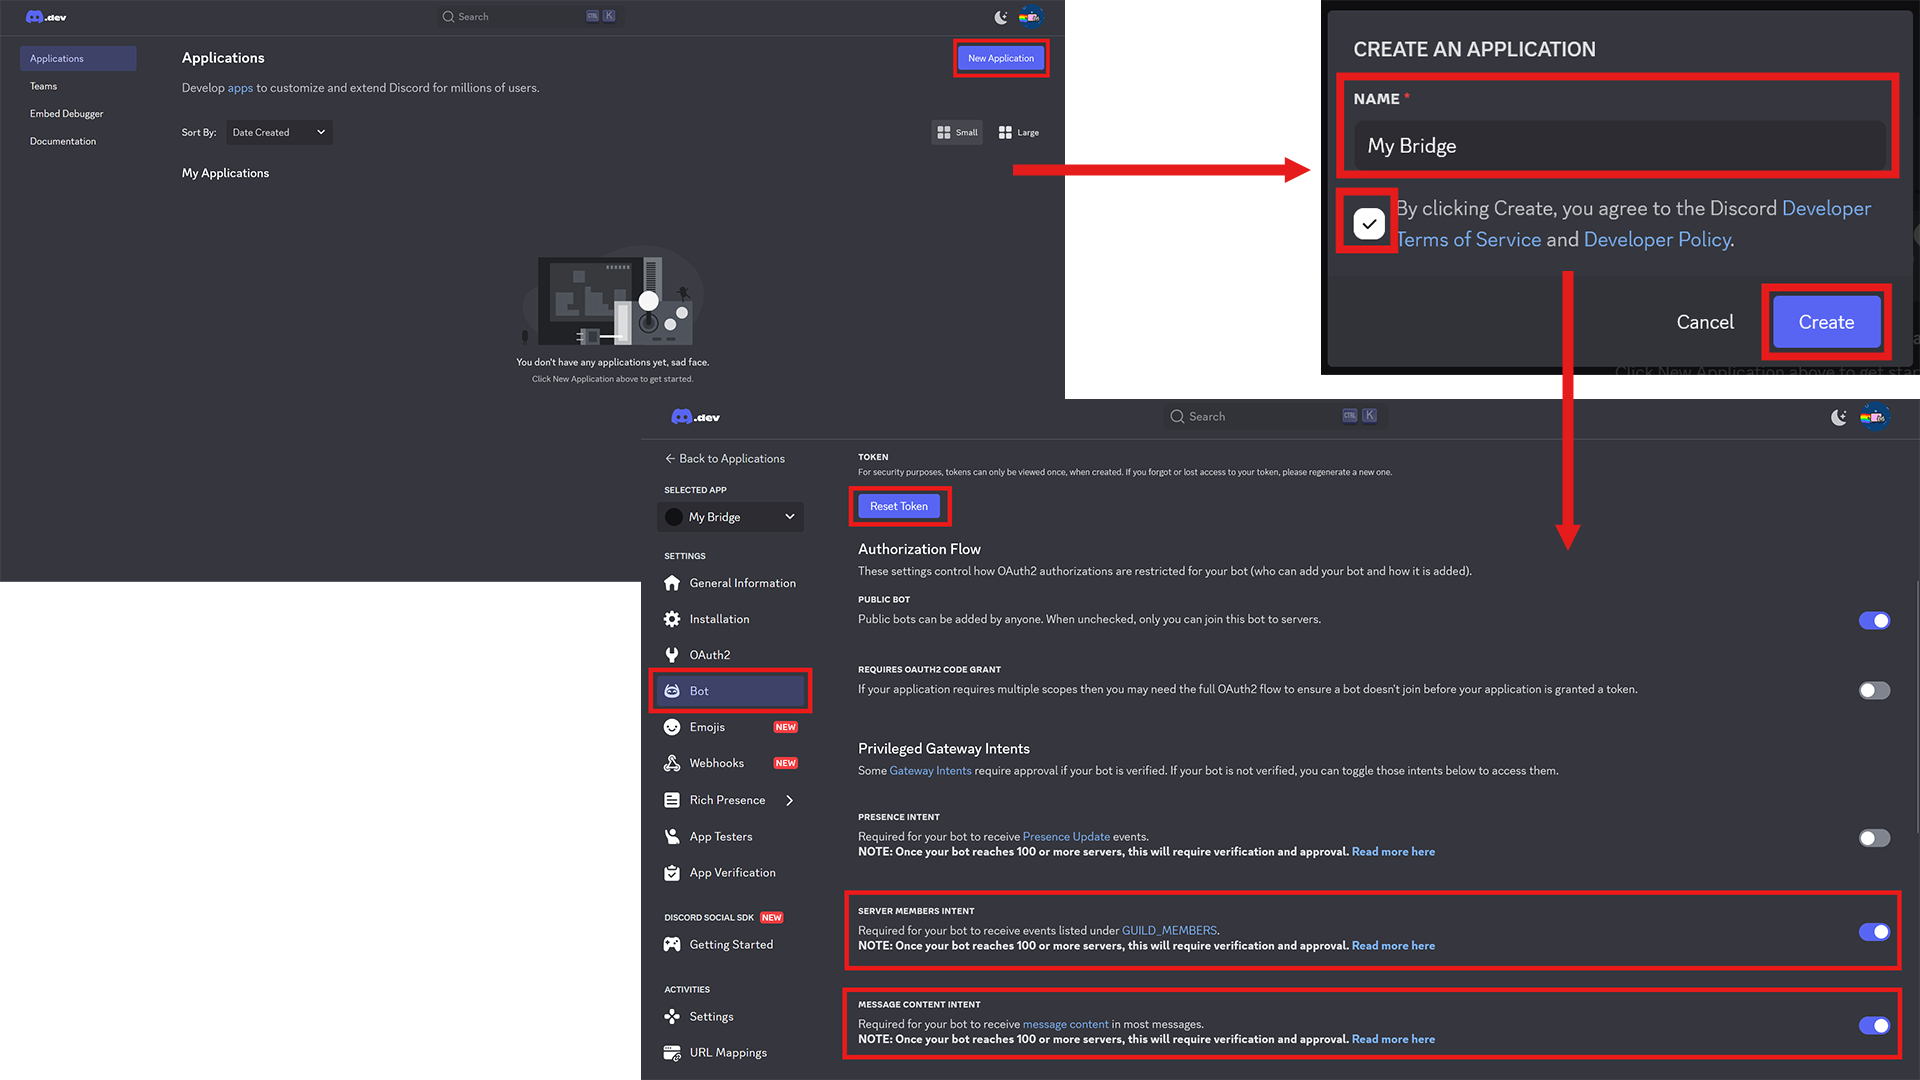
<p>Now to create a Discord bot application and add it to your server.</p>

<p>Visit the <a href="https://discord.com/developers/applications">Discord Developer Portal</a>
and log in. From there, create your bridge application.</p>

<p>Now, click on the “Bot” tab. Here you can do some customization of how your bot
appears in channels, such as adding a profile photo. Reset your bot token and
copy it and save it somewhere safe for later. It should be in the <a href="https://en.wikipedia.org/wiki/JSON_Web_Token">JWT</a>
format and it should look like a bunch of random characters with two dots in the
middle. Additionally, you need to add the privileged intents for “Server Members”
and “Message Content”.</p>

<p><img src="/public/img/2025/07/08/discord-reset-token-add-intents.png" alt="Discord  Developer Portal UI with a 'New Application' button highlighted with a red box. An arrow leads to a modal labeled 'Create an Application', with a red box highlighting the name field, with 'My Bridge' filled in. A checkbox and the 'Create' button are both highlighted with red boxes. An arrow leads to the 'Bot' tab highlighted in the sidebar. The 'Reset Token' button is highlighted with a red box. The 'Server Members Intent' section and the 'Message Content Intent' sections are also highlighted with red boxes, with the slider toggled on." /></p>

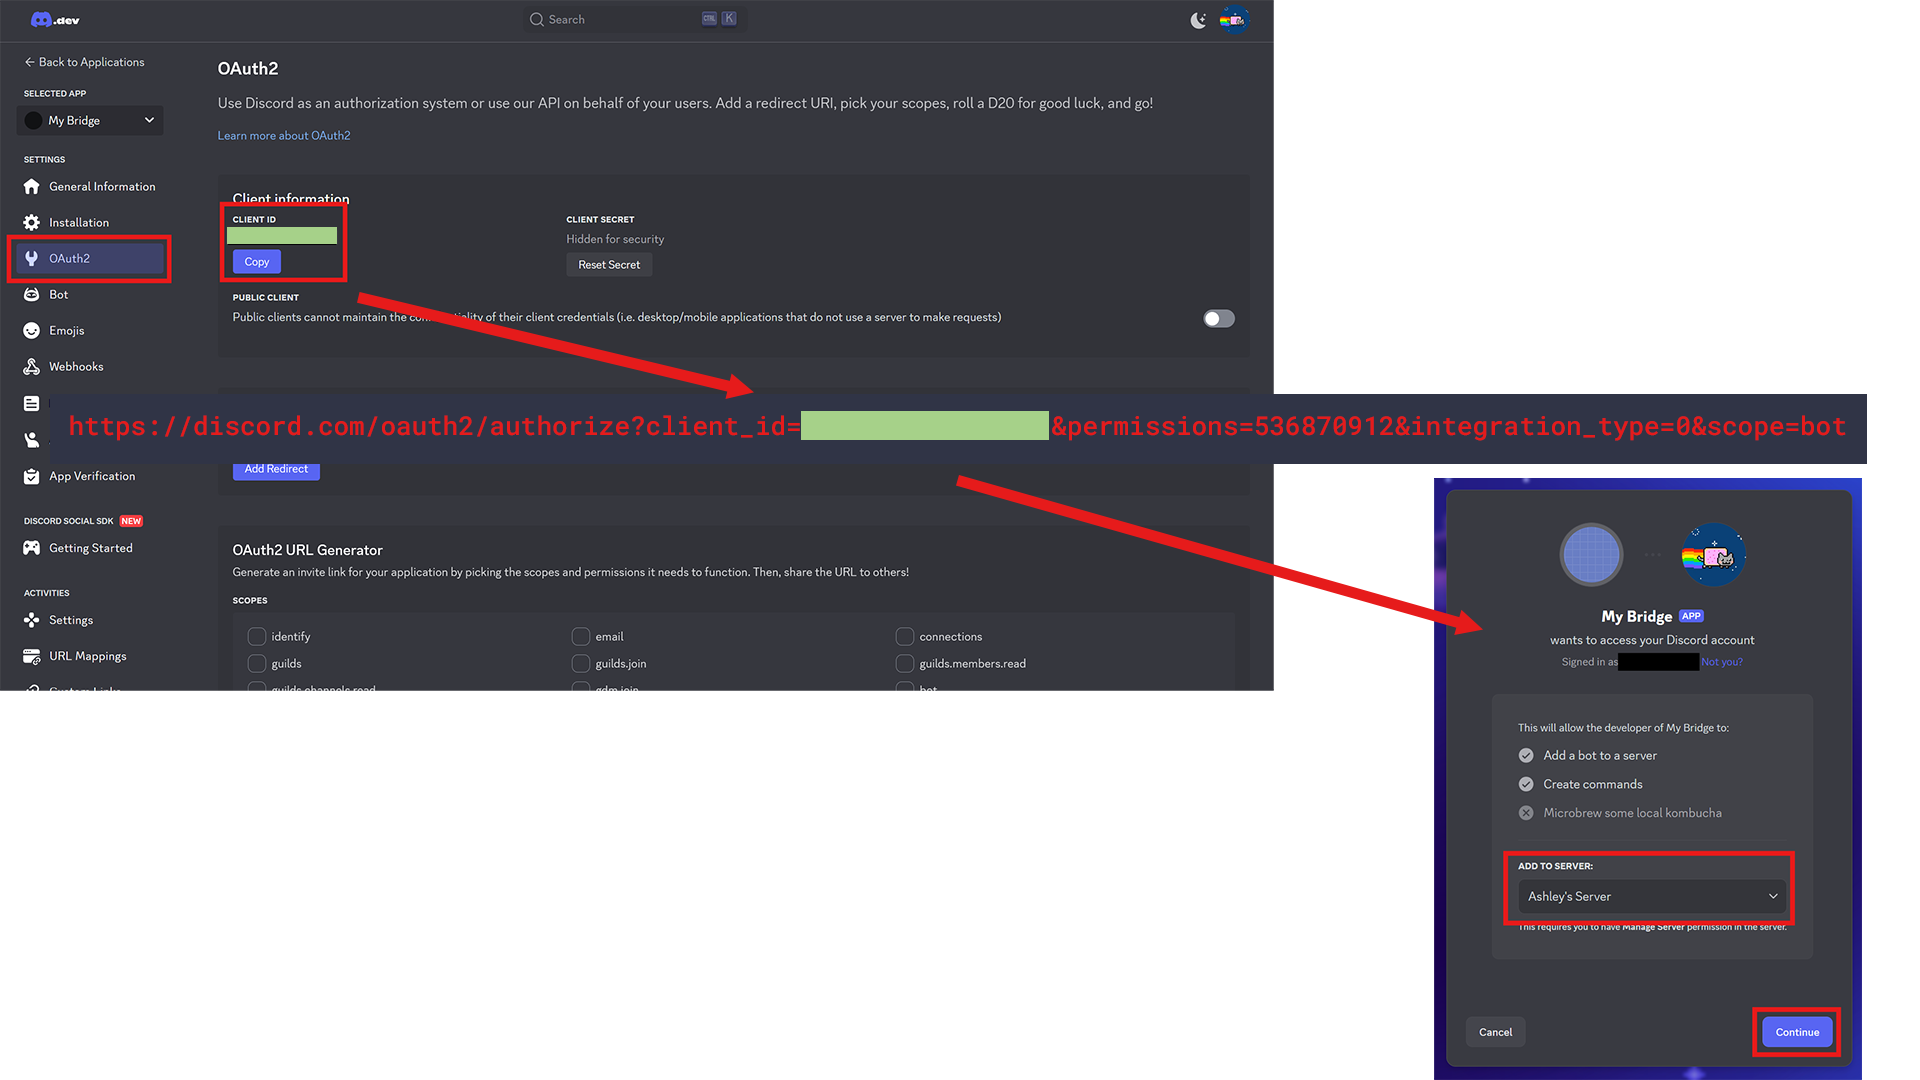
<p>Now get your application’s Client ID from the “OAuth2” tab. Next, visit <code class="language-plaintext highlighter-rouge">https://discord.com/oauth2/authorize?client_id=&lt;CLIENT_ID_HERE&gt;&amp;permissions=536870912&amp;integration_type=0&amp;scope=bot</code>,
replacing <code class="language-plaintext highlighter-rouge">&lt;CLIENT_ID_HERE&gt;</code> with the Client ID from the panel. If you don’t have
admin permissions on the server you want to bridge, you can instead send the
link to that server’s admin. Otherwise, continue adding the bot to the server
yourself.</p>

<p><img src="/public/img/2025/07/08/discord-invite-bot.png" alt="Discord Developer Portal UI with the 'OAuth2' tab selected. A red box is around the 'Client ID' section, with the ID censored in green. There is a red arrow to the text  'https://discord.com/oauth2/authorize?client_id=&lt;CLIENT_ID_HERE&gt;&amp;permissions=536870912&amp;integration_type=0&amp;scope=bot', but the &lt;CLIENT_ID_HERE&gt; section is censored in green. Then a red arrow points from the URL to a modal labeled 'My Bridge wants access to your Discord Account', with the section 'Add to Server' highlighted with a red box and 'Ashley's Server' highlighted in the dropdown menu. There is a red box around the 'Continue' button." /></p>

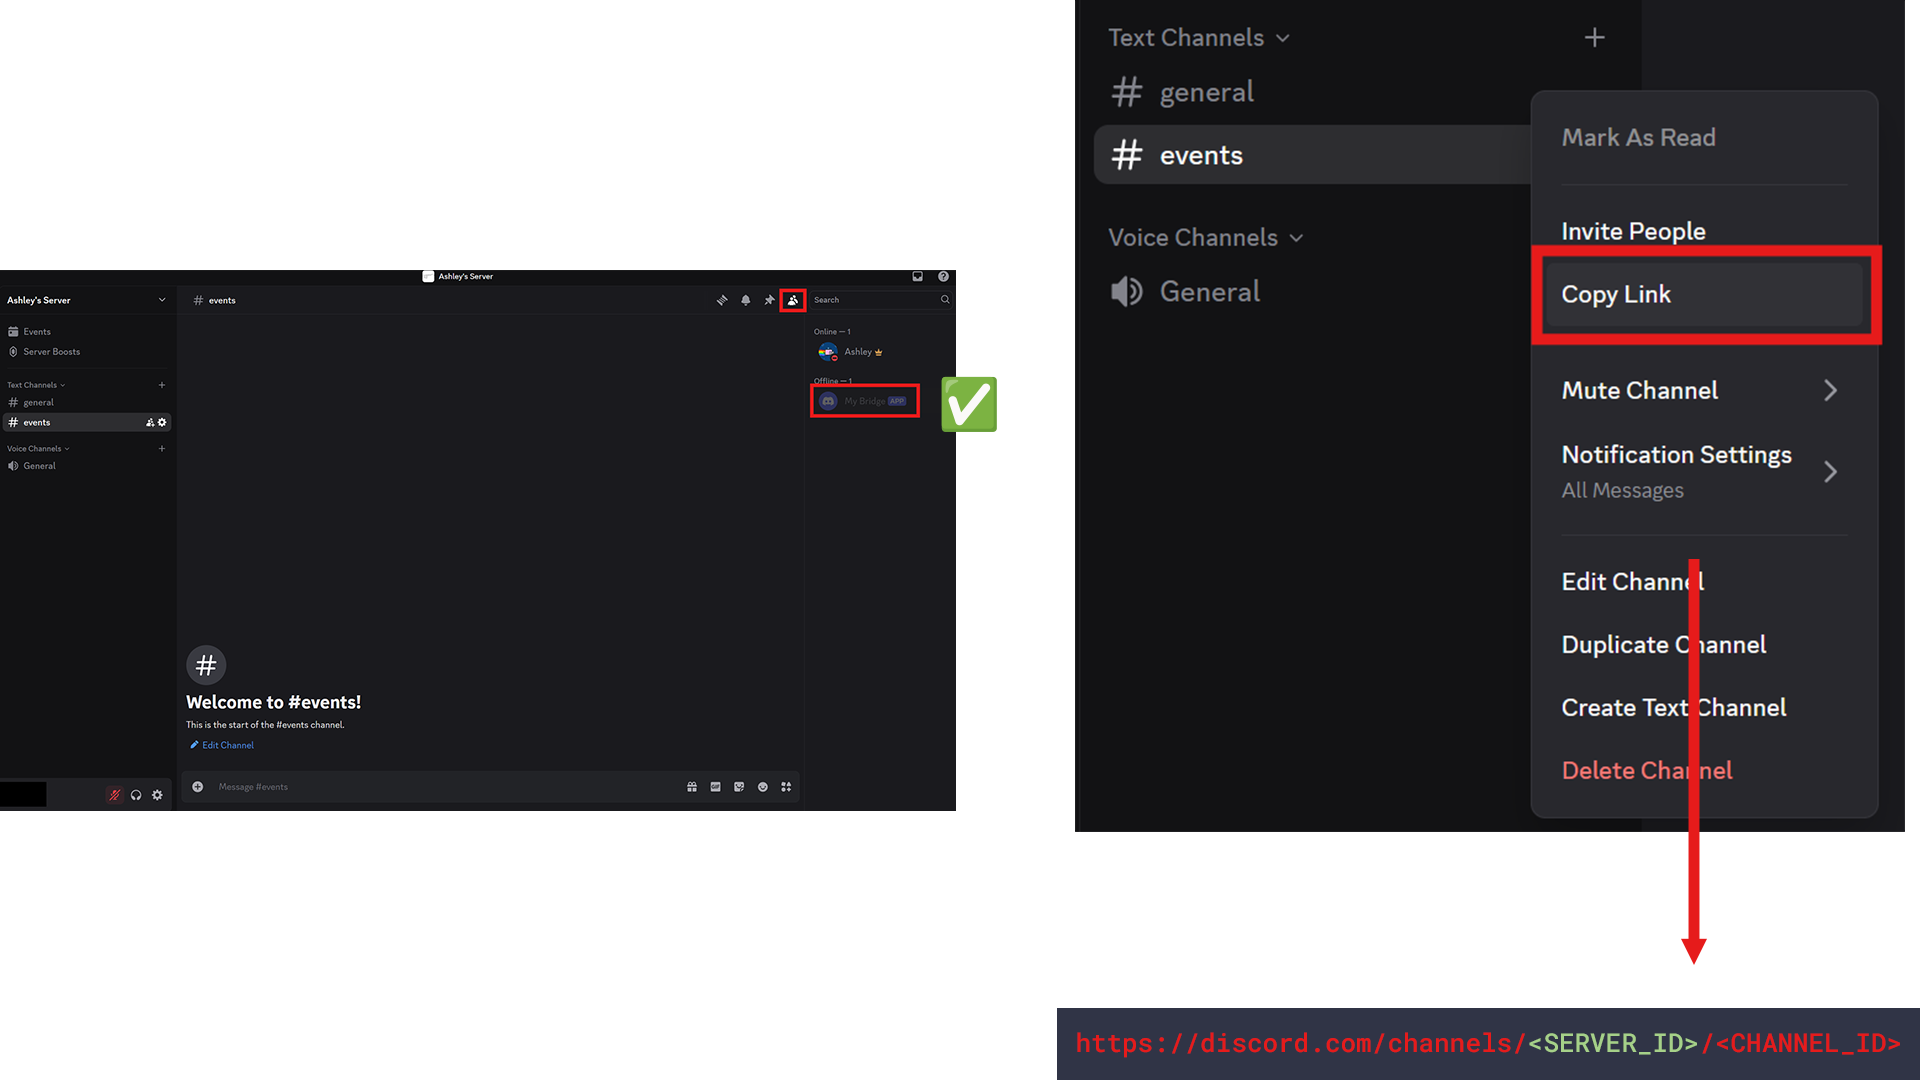
<p>Your bot should now be in your Discord server. By default, most servers let your
bot read and write in all channels. However if your server has custom roles and
permissions, ensure the bot has the permissions to view and send messages in the
channels you wish to bridge. One easy way to see if a bot is in a channel is to
double check the sidebar.</p>

<p>Finally, we need to get the ID of the Discord server that is going to have the
linked channels. Find one of the channels you wish to link and right click. Then
select “Copy Link”. The link should look something like <code class="language-plaintext highlighter-rouge">https://discord.com/channels/&lt;SERVER_ID&gt;/&lt;CHANNEL_ID&gt;</code>.
Take the Server ID between the slashes it and save it somewhere safe for later.</p>

<p><img src="/public/img/2025/07/08/discord-check-in-channel-and-get-server-id.png" alt="Discord UI with red box around 'Members List' icon and a red box around the 'My Bridge' user in the sidebar. A checkmark is displayed next to the user. There is also a Discord channel list where a menu is popped up next to the list. In that menu the 'Copy Link' option is highlighted with a red box. From there is a red arrow down to the text 'https://discord.com/channels/&lt;SERVER_ID&gt;/&lt;CHANNEL_ID&gt;' with the '&lt;SERVER_ID&gt;' portion highlighted in green." /></p>

<h2 id="server-setup">Server Setup</h2>

<p><strong>Note:</strong> This portion of the guide temporarily has an extra step building a 
patched version of matterbridge due to Slack <a href="https://api.slack.com/changelog/2024-04-discontinuing-new-creation-of-classic-slack-apps-and-custom-bots">discontinuing “legacy” apps</a>.
This guide will be updated when matterbridge is fully updated to support “modern”
Slack apps.</p>

<p>First clone the <a href="https://github.com/kolsys/matterbridge/tree/master">kolsys fork</a>
of matterbridge. Open your terminal, or on Windows open PowerShell. Navigate to
a folder you’d like to locate the project with the <code class="language-plaintext highlighter-rouge">cd</code> command. Then use 
<code class="language-plaintext highlighter-rouge">git clone https://github.com/kolsys/matterbridge.git</code>. to clone the matterbridge
code with kolsys’s patch into the <code class="language-plaintext highlighter-rouge">matterbridge</code> folder. Then use <code class="language-plaintext highlighter-rouge">cd ./matterbridge</code>
to navigate into the folder.</p>

<p>Make sure Docker is running, then use <code class="language-plaintext highlighter-rouge">sudo docker build -t matterbridge-slack-patch .</code>
to build the code into an image that we can run. I have run into some out-of-memory
issues building this before on one of my less powerful servers. I resolved it by
<a href="https://www.digitalocean.com/community/tutorials/how-to-add-swap-space-on-ubuntu-20-04">adding swap space</a>.</p>

<p>Create a file in the folder called <code class="language-plaintext highlighter-rouge">docker-compose.yml</code> with the command
<code class="language-plaintext highlighter-rouge">nano docker-compose.yml</code> or <code class="language-plaintext highlighter-rouge">notepad.exe docker-compose.yml</code> on Windows. Feel
free to use your favorite code editor instead (like <a href="https://www.vim.org/">vim</a>),
these are just the easiest options for a quick tutorial. Copy and paste this
configuration file.</p>

<div class="language-yml highlighter-rouge"><div class="highlight"><pre class="highlight"><code><span class="na">services</span><span class="pi">:</span>
  <span class="na">matterbridge</span><span class="pi">:</span>
    <span class="na">image</span><span class="pi">:</span> <span class="s">matterbridge-slack-patch</span>
    <span class="na">restart</span><span class="pi">:</span> <span class="s">unless-stopped</span>
    <span class="na">volumes</span><span class="pi">:</span>
    <span class="pi">-</span> <span class="s">./matterbridge.toml:/etc/matterbridge/matterbridge.toml:ro</span>
    <span class="na">command</span><span class="pi">:</span> <span class="pi">[</span><span class="s2">"</span><span class="s">/bin/matterbridge"</span><span class="pi">,</span> <span class="s2">"</span><span class="s">-conf"</span><span class="pi">,</span> <span class="s2">"</span><span class="s">/etc/matterbridge/matterbridge.toml"</span><span class="pi">]</span>

</code></pre></div></div>

<p>With nano, save by using <code class="language-plaintext highlighter-rouge">Ctrl + O</code> then <code class="language-plaintext highlighter-rouge">Enter</code> and then exit by using <code class="language-plaintext highlighter-rouge">Ctrl + X</code>. With Windows
Notepad, save by using <code class="language-plaintext highlighter-rouge">Ctrl + S</code>, then exit with <code class="language-plaintext highlighter-rouge">Alt + F4</code>. This configuration file
tells Docker how we want the image to be run in a container.</p>

<p>Create a file in the folder called <code class="language-plaintext highlighter-rouge">matterbridge.toml</code> by running <code class="language-plaintext highlighter-rouge">nano matterbridge.toml</code>
in the terminal. Copy and paste this configuration file.</p>

<div class="language-toml highlighter-rouge"><div class="highlight"><pre class="highlight"><code><span class="nn">[slack]</span>
<span class="nn">[slack.myworkspace]</span>
<span class="py">Token</span><span class="p">=</span><span class="s">"xoxb-**********-*************-************************"</span>
<span class="py">AppToken</span><span class="p">=</span><span class="s">"xapp-*-***********-*************-****************************************************************"</span>
<span class="py">PrefixMessagesWithNick</span><span class="p">=</span><span class="kc">true</span>

<span class="nn">[discord]</span>
<span class="nn">[discord.myserver]</span>
<span class="py">Token</span><span class="p">=</span><span class="s">"**************************.******.**************************************"</span>
<span class="py">Server</span><span class="p">=</span><span class="s">"******************"</span>

<span class="nn">[general]</span>
<span class="py">RemoteNickFormat</span><span class="p">=</span><span class="s">"[{PROTOCOL}/{BRIDGE}] &lt;{NICK}&gt; "</span>

<span class="nn">[[gateway]]</span>
    <span class="py">name</span> <span class="p">=</span> <span class="s">"mygateway-general"</span>
    <span class="py">enable</span><span class="p">=</span><span class="kc">true</span>

    <span class="nn">[[gateway.inout]]</span>
    <span class="py">account</span> <span class="p">=</span> <span class="s">"discord.myserver"</span>
    <span class="py">channel</span> <span class="p">=</span> <span class="s">"general"</span>

    <span class="nn">[[gateway.inout]]</span>
    <span class="py">account</span> <span class="p">=</span> <span class="s">"slack.myworkspace"</span>
    <span class="py">channel</span> <span class="p">=</span> <span class="s">"general"</span>

<span class="nn">[[gateway]]</span>
    <span class="py">name</span> <span class="p">=</span> <span class="s">"mygateway-events"</span>
    <span class="py">enable</span><span class="p">=</span><span class="kc">true</span>

    <span class="nn">[[gateway.inout]]</span>
    <span class="py">account</span> <span class="p">=</span> <span class="s">"discord.myserver"</span>
    <span class="py">channel</span> <span class="p">=</span> <span class="s">"events"</span>

    <span class="nn">[[gateway.inout]]</span>
    <span class="py">account</span> <span class="p">=</span> <span class="s">"slack.myworkspace"</span>
    <span class="py">channel</span> <span class="p">=</span> <span class="s">"events"</span>

</code></pre></div></div>

<p>Inside the quotes where it says <code class="language-plaintext highlighter-rouge">Token</code> and <code class="language-plaintext highlighter-rouge">AppToken</code> in the Slack section, 
replace it with the Slack tokens that were saved earlier. Where it says <code class="language-plaintext highlighter-rouge">Token</code>
and <code class="language-plaintext highlighter-rouge">Server</code> in the Discord section, replace it with the token and server ID that
were saved earlier. 🚨 <strong>As a side note, it’s important to keep these tokens safe.
If these tokens were to fall into the wrong hands, someone could read private 
messages in your channels, or send spam.</strong> 🚨</p>

<p>This config file is an example that links the #general and #events channels.
Customize your configuration file to use which names and channels you wish. You
can also add additional gateways.</p>

<p>With nano, save by using <code class="language-plaintext highlighter-rouge">Ctrl + O</code> then <code class="language-plaintext highlighter-rouge">Enter</code> and then exit by using <code class="language-plaintext highlighter-rouge">Ctrl + X</code>. With Windows
Notepad, save by using <code class="language-plaintext highlighter-rouge">Ctrl + S</code>, then exit with <code class="language-plaintext highlighter-rouge">Alt + F4</code>. This configuration file
tells matterbridge the authentication tokens to log in, and which channels to
link together.</p>

<p>You can now run everything by using the command <code class="language-plaintext highlighter-rouge">docker compose up -d</code> while your
terminal is in the <code class="language-plaintext highlighter-rouge">matterbridge</code> folder. Everything should now be running! You
can stop running matterbridge by using <code class="language-plaintext highlighter-rouge">docker compose down</code>. You can use
<code class="language-plaintext highlighter-rouge">docker compose logs</code> to check the logs and debug if there are any errors.</p>

<h2 id="conclusion">Conclusion</h2>

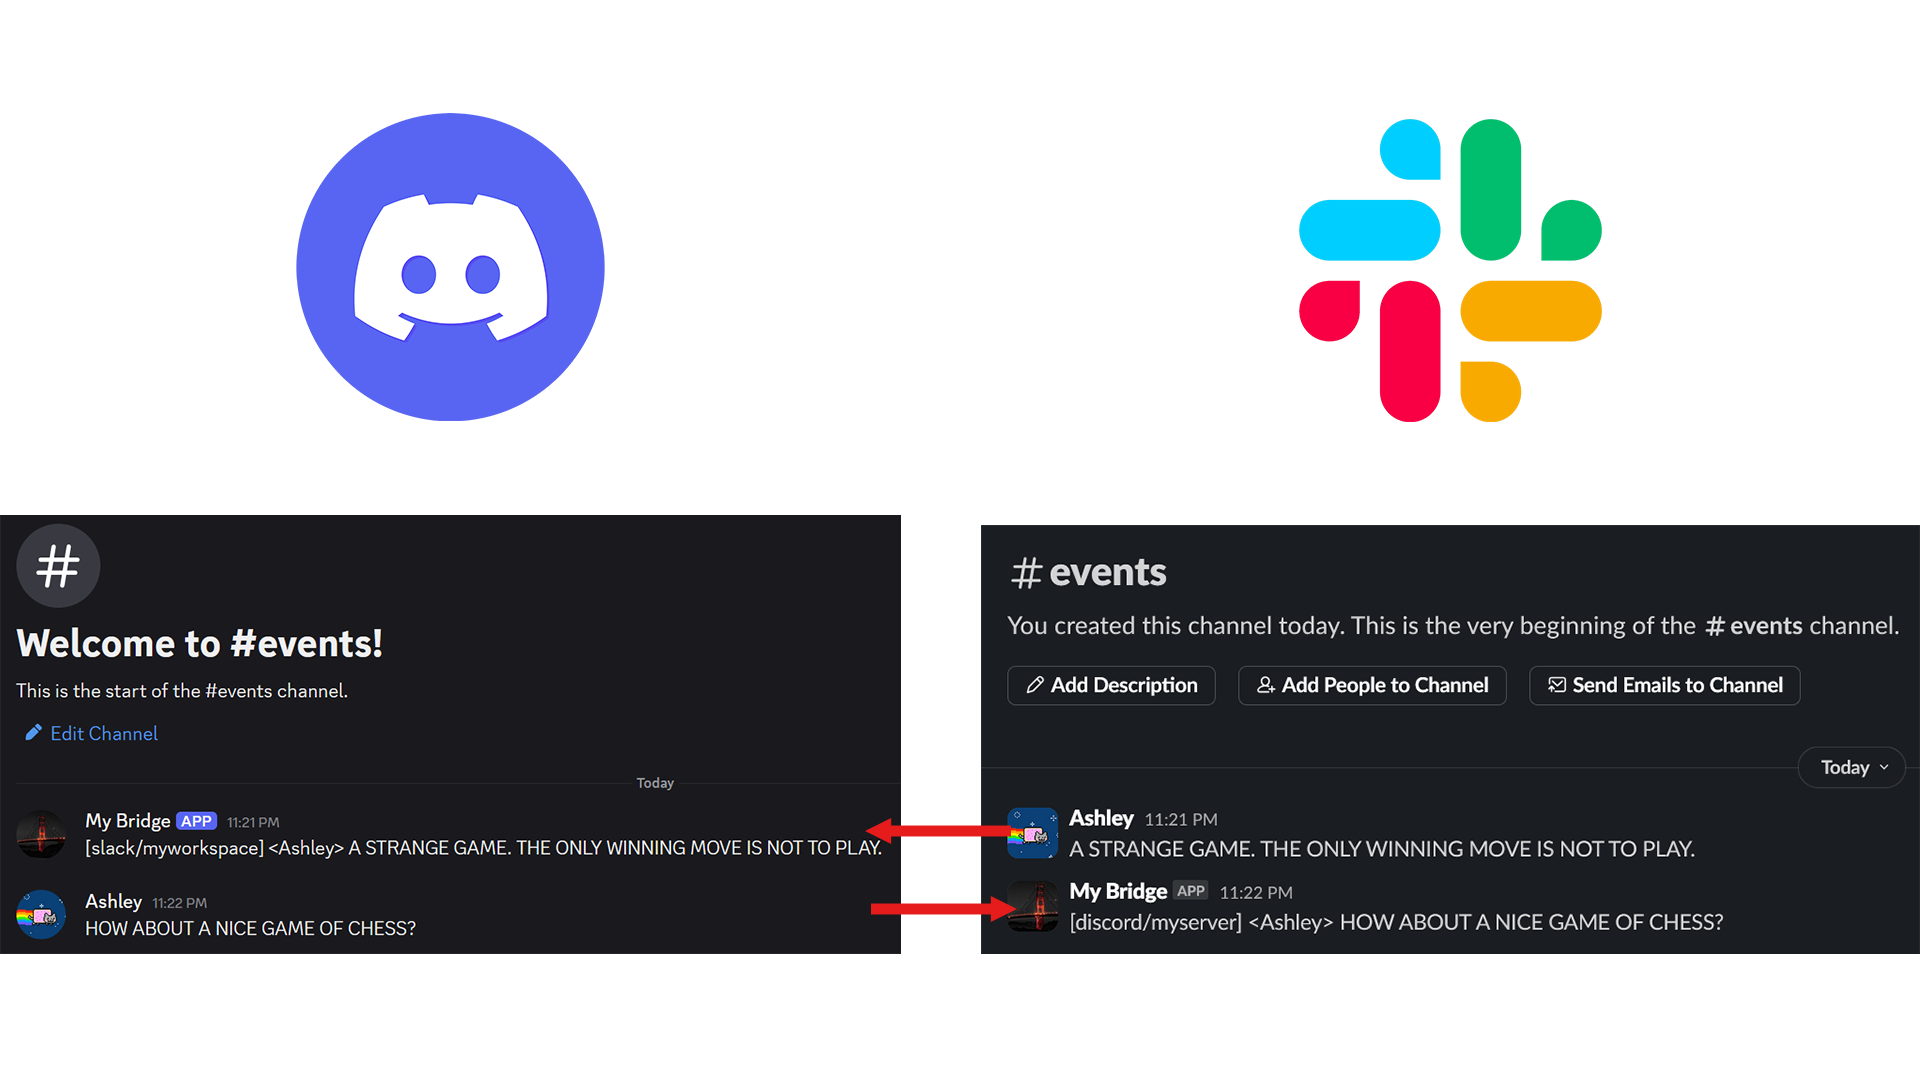
<p>Your Discord channels and Slack channels should now be linked 🎉! Messages you send
in Discord should be replicated in Slack, and messages you send in Slack should
be replicated in Discord.</p>

<p><img src="/public/img/2025/07/08/discord-slack-linked.png" alt="On the left is a Discord logo and a Discord channel labeled '#events'. On the right is a Slack logo and a channel labeled '#events'. In both channels are messages reading 'A STRANGE GAME, THE ONLY WINNING MOVE IS NOT TO PLAY.' and 'HOW ABOUT A NICE GAME OF CHESS?'. There are red arrows indicating that a message sent in Slack by  'Ashley' was replicated in Discord by the 'My Bridge' bot. Another arrow shows how a message sent in Discord by 'Ashley' was sent in Slack by 'My Bridge'." /></p>

<p>With matterbridge, you can bridge more than just Slack and Discord. Visit the
<a href="https://github.com/42wim/matterbridge/wiki">matterbridge wiki</a> for more information.</p>

<p>Thank you to the free and open source <a href="https://github.com/42wim/matterbridge/graphs/contributors">contributors to matterbridge</a>,
and especially <a href="https://github.com/kolsys">kolsys</a> for making the “modern” Slack
app patch. Contributors like these help <a href="https://xkcd.com/2347/">keep modern technology running</a>.
Now go do something today to make the world a better place!</p>]]></content><author><name>Ashley Bilbrey</name></author><summary type="html"><![CDATA[A step-by-step guide on how to make a Discord bot and Slack bot to link channels.]]></summary></entry></feed>